GLM-Image代表了AI图像生成领域的重大进步,其结合了自回归和扩散两种架构,突破了视觉保真度的边界。对于构建AI驱动视觉应用的开发者和企业来说,高效部署这个模型至关重要——但传统的设置过程涉及复杂的依赖关系、环境配置和基础设施管理。
Novita AI通过预配置的GPU模板消除了这些障碍,让你在几分钟内(而非数小时)就能部署GLM-Image。本指南将带你完成完整的部署过程,从模板选择到运行第一次推理,并包含针对生产工作负载的优化策略。
无论你是原型化内容生成工具、构建电商可视化平台,还是将高级图像合成集成到你的应用中,本教程都提供了在企业级GPU基础设施上运行GLM-Image所需的一切。
什么是GLM-Image?
GLM-Image是一个先进的图像生成模型,它结合了自回归和扩散解码器架构,以提供卓越的视觉质量和精细细节渲染。由ZAI团队开发,这种混合方法使GLM-Image成为传统潜在扩散模型(LDM)的有力替代方案,尤其在知识密集型图像生成场景中表现出色。
该模型独特的架构使其能够生成高度详细的图像,同时保持与行业标准方法相竞争的性能。无论你是在构建AI驱动的设计工具、内容创作平台还是视觉合成应用,GLM-Image都通过其文本到图像和图像到图像的生成能力提供灵活性和精确性。
关键能力:
- 混合自回归+扩散架构,实现卓越的视觉保真度
- 文本到图像生成,具备详细的提示理解能力
- 图像到图像的转换和风格迁移
- 多图像条件生成
- 支持高分辨率输出(可自定义尺寸)
有关完整的技术规格和模型文档,请访问GLM-Image官方仓库。
为什么在Novita AI上部署GLM-Image?
Novita AI的GPU基础设施为运行GLM-Image提供了理想环境,具备预配置模板、即时部署和可扩展的计算资源。与手动设置本地环境或管理云实例不同,Novita AI简化了从模板选择到运行推理的整个部署过程。
逐步部署指南
步骤1:访问GPU控制台
导航到Novita AI的GPU界面,点击 开始使用 进入部署管理仪表板。

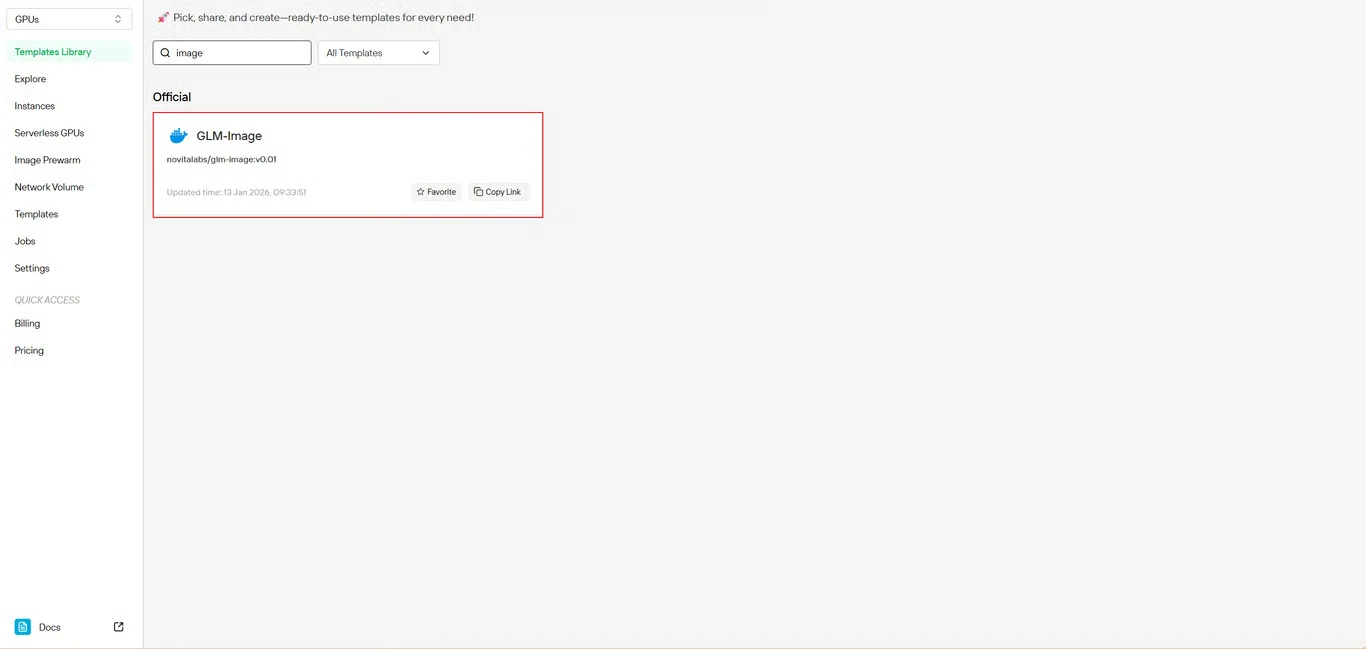
步骤2:选择GLM-Image模板
在模板库中找到 GLM-Image。Novita AI预构建的模板包含所有必要的依赖项,无需复杂的环境搭建。
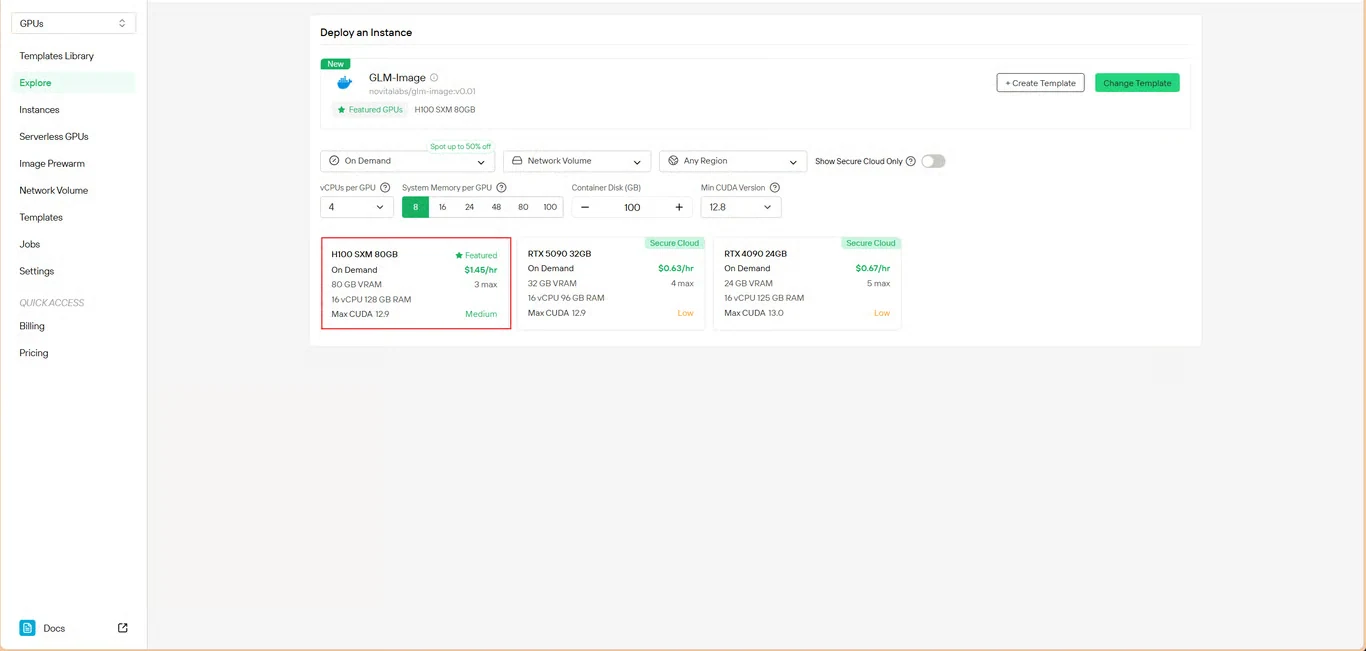
步骤3:配置基础设施
设置你的计算参数:
- 内存分配:确保有足够的VRAM来容纳模型权重
- 存储需求:分配用于模型文件和生成图像的空间
- 网络设置:根据你的访问需求进行配置
点击 部署 以继续配置。
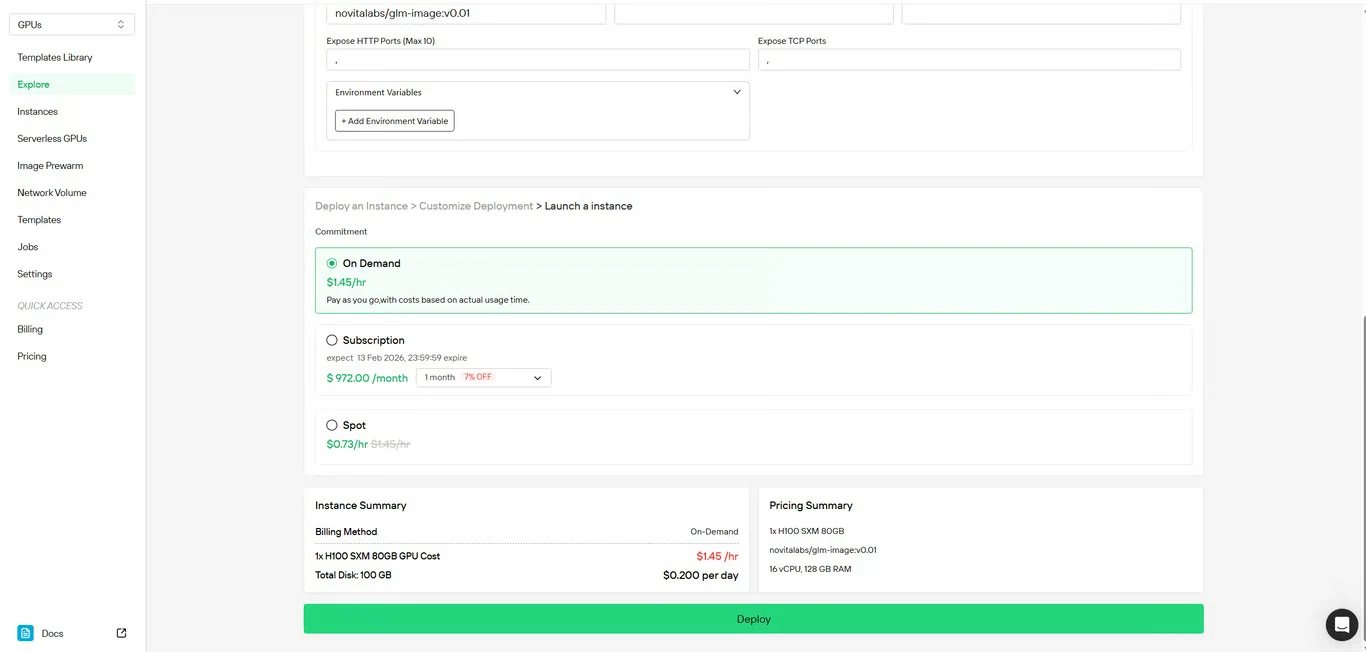
步骤4:审查配置
仔细检查你的设置细节和成本摘要。确认无误后,点击 部署 以启动实例创建。
步骤5:监控部署
系统会自动将你重定向到实例管理页面。你的GLM-Image实例将在后台创建——无需手动干预。
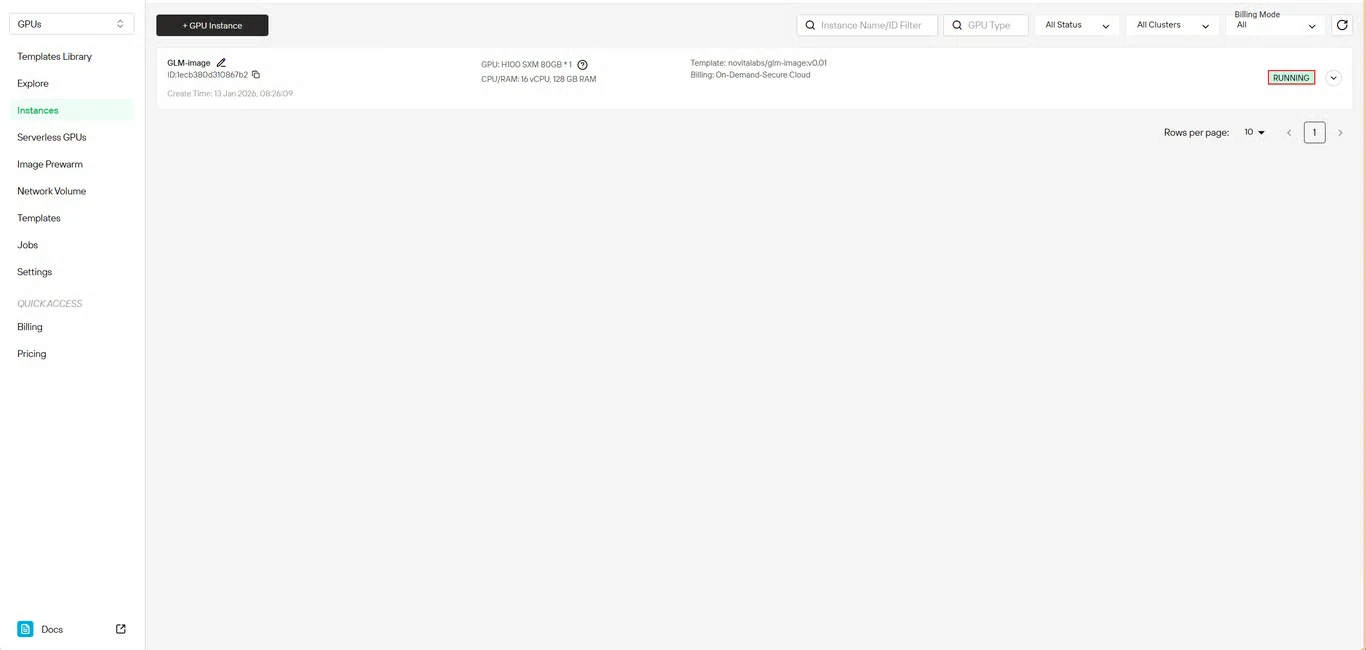
步骤6:跟踪下载进度

实时监控模型下载状态。部署完成后,你的实例状态将从 拉取中 变为 运行中。点击实例名称旁边的箭头图标可查看详细的进度信息。
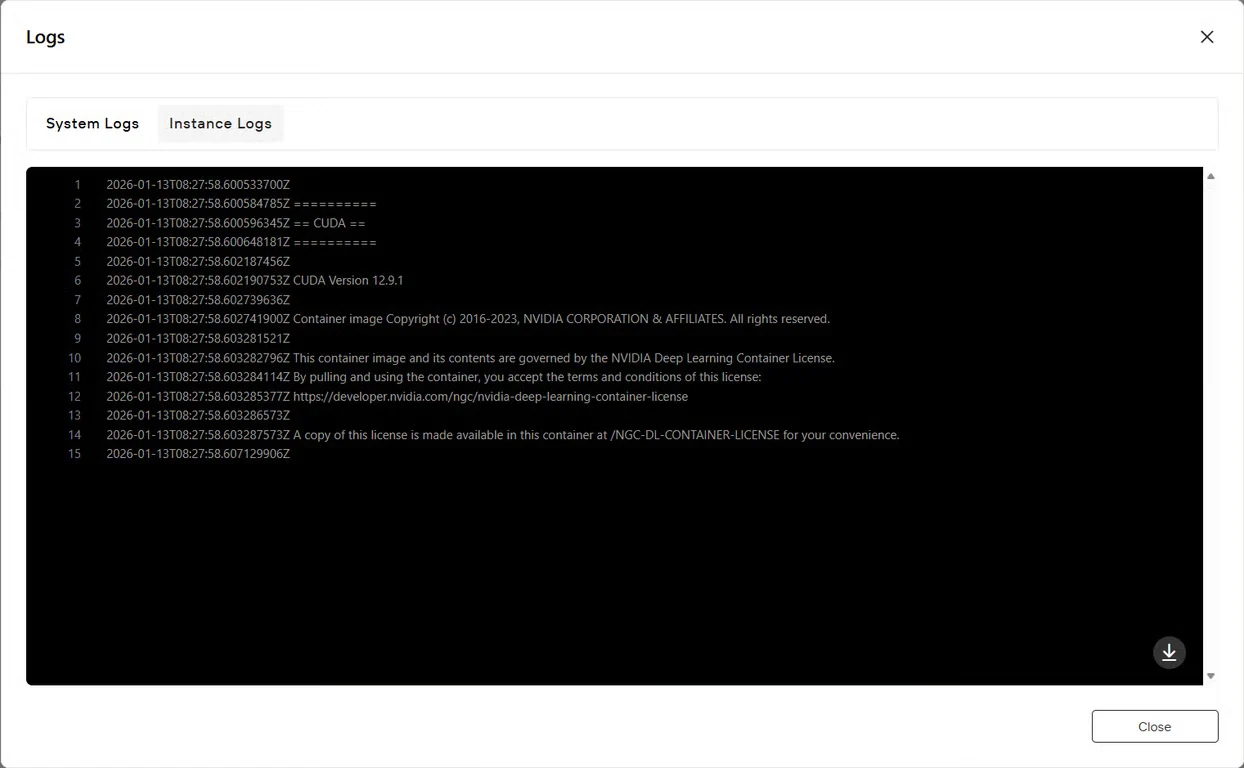
步骤7:验证服务状态
点击 日志 按钮查看实例日志,确认GLM-Image服务已成功启动。查找初始化确认消息,指示模型已准备好进行推理。
如何开始
示例 text2image.py
import torch
from diffusers.pipelines.glm_image import GlmImagePipeline
pipe = GlmImagePipeline.from_pretrained("zai-org/GLM-Image", torch_dtype=torch.bfloat16, device_map="cuda")
prompt = "A beautifully designed modern food magazine style dessert recipe illustration, themed around a raspberry mousse cake. The overall layout is clean and bright, divided into four main areas: the top left features a bold black title 'Raspberry Mousse Cake Recipe Guide', with a soft-lit close-up photo of the finished cake on the right, showcasing a light pink cake adorned with fresh raspberries and mint leaves; the bottom left contains an ingredient list section, titled 'Ingredients' in a simple font, listing 'Flour 150g', 'Eggs 3', 'Sugar 120g', 'Raspberry puree 200g', 'Gelatin sheets 10g', 'Whipping cream 300ml', and 'Fresh raspberries', each accompanied by minimalist line icons (like a flour bag, eggs, sugar jar, etc.); the bottom right displays four equally sized step boxes, each containing high-definition macro photos and corresponding instructions, arranged from top to bottom as follows: Step 1 shows a whisk whipping white foam (with the instruction 'Whip egg whites to stiff peaks'), Step 2 shows a red-and-white mixture being folded with a spatula (with the instruction 'Gently fold in the puree and batter'), Step 3 shows pink liquid being poured into a round mold (with the instruction 'Pour into mold and chill for 4 hours'), Step 4 shows the finished cake decorated with raspberries and mint leaves (with the instruction 'Decorate with raspberries and mint'); a light brown information bar runs along the bottom edge, with icons on the left representing 'Preparation time: 30 minutes', 'Cooking time: 20 minutes', and 'Servings: 8'. The overall color scheme is dominated by creamy white and light pink, with a subtle paper texture in the background, featuring compact and orderly text and image layout with clear information hierarchy."
image = pipe(
prompt=prompt,
height=32 * 32,
width=36 * 32,
num_inference_steps=30,
guidance_scale=1.5,
generator=torch.Generator(device="cuda").manual_seed(42),
).images[0]
image.save("output_t2i.png")
你可以修改 text2image.py 中的 prompt 来运行,或者直接使用现有示例运行。
python3 text2image.py

$ python3 text2image.py
Couldn't connect to the Hub: Cannot reach https://huggingface.co/api/models/zai-org/GLM-Image: offline mode is enabled. To disable it, please unset the `HF_HUB_OFFLINE` environment variable..
Will try to load from local cache.
Loading checkpoint shards: 100%|████████████████████████████████████████████████████████████████████████████████████████████████████████████████████████████████████████████████████| 3/3 [00:02<00:00,  1.47it/s]
Loading weights: 100%|█████████████████████████████████████████████████████████████████████████████████████████████████████████████████████| 111/111 [00:00<00:00, 1391.52it/s, Materializing param=shared.weight]
Loading pipeline components...:  71%|██████████████████████████████████████████████████████████████████████████████████████████████████████▏                                        | 5/7 [00:02<00:00,  2.91it/s]Using a slow image processor as `use_fast` is unset and a slow processor was saved with this model. `use_fast=True` will be the default behavior in v4.52, even if the model was saved with a slow processor. This will result in minor differences in outputs. You'll still be able to use a slow processor with `use_fast=False`.
Loading weights: 100%|██████████████████████████████████████████████████████████████████████████████████████████| 1011/1011 [00:02<00:00, 359.59it/s, Materializing param=model.vqmodel.quantize.embedding.weight]
Loading pipeline components...: 100%|███████████████████████████████████████████████████████████████████████████████████████████████████████████████████████████████████████████████| 7/7 [00:07<00:00,  1.02s/it]
100%|█████████████████████████████████████████████████████████████████████████████████████████████████████████████████████████████████████████████████████████████████████████████| 30/30 [00:11<00:00,  2.69it/s]
output_t2i.png
示例 image2image.py
import torch
from diffusers.pipelines.glm_image import GlmImagePipeline
from PIL import Image

pipe = GlmImagePipeline.from_pretrained("zai-org/GLM-Image", torch_dtype=torch.bfloat16, device_map="cuda")
image_path = "cond.jpg"
prompt = "Replace the background of the snow forest with an underground station featuring an automatic escalator."
image = Image.open(image_path).convert("RGB")
image = pipe(
    prompt=prompt,
    image=[image],  # can input multiple images for multi-image-to-image generation such as [image, image1]
    height=33 * 32,
    width=32 * 32,
    num_inference_steps=30,
    guidance_scale=1.5,
    generator=torch.Generator(device="cuda").manual_seed(42),
).images[0]

image.save("output_i2i.png")
你可以修改 text2image.py 中的 prompt 和 image 来运行,或者直接使用现有示例运行。
$ python3 image2image.py

Couldn't connect to the Hub: Cannot reach https://huggingface.co/api/models/zai-org/GLM-Image: offline mode is enabled. To disable it, please unset the `HF_HUB_OFFLINE` environment variable..
Will try to load from local cache.
Loading pipeline components...:   0%|                                                                                                                                                       | 0/7 [00:00<?, ?it/s]Using a slow image processor as `use_fast` is unset and a slow processor was saved with this model. `use_fast=True` will be the default behavior in v4.52, even if the model was saved with a slow processor. This will result in minor differences in outputs. You'll still be able to use a slow processor with `use_fast=False`.
Loading weights: 100%|██████████████████████████████████████████████████████████████████████████████████████████| 1011/1011 [00:02<00:00, 360.88it/s, Materializing param=model.vqmodel.quantize.embedding.weight]
Loading checkpoint shards: 100%|████████████████████████████████████████████████████████████████████████████████████████████████████████████████████████████████████████████████████| 3/3 [00:02<00:00,  1.46it/s]
Loading weights: 100%|█████████████████████████████████████████████████████████████████████████████████████████████████████████████████████| 111/111 [00:00<00:00, 1426.62it/s, Materializing param=shared.weight]
Loading pipeline components...: 100%|███████████████████████████████████████████████████████████████████████████████████████████████████████████████████████████████████████████████| 7/7 [00:07<00:00,  1.03s/it]
100%|███████████████████████████████████████████████████████████████████████████████████| 30/30 [00:10<00:00,  2.97it/s]
GLM-Image的使用场景
GLM-Image的混合架构使其在以下场景中特别有效:
- 电子商务:产品可视化和变体生成
- 市场营销:营销活动创意和社交媒体内容
- 出版:编辑插图和信息图表
- 设计:概念艺术和视觉原型设计
- 教育:教学图表和视觉学习材料
该模型在知识密集型生成方面的优势意味着它可以准确渲染具有特定要求的复杂场景——非常适合同时需要创造力和精确性的项目。
在Novita AI上开始使用GLM-Image
今天就在Novita AI的GPU基础设施上部署GLM-Image,无需手动设置的复杂性即可获得企业级图像生成能力。访问GLM-Image模板页面开始你的部署。
Novita AI 是一个领先的AI云平台,为开发者提供易于使用的API和价格实惠、可靠的GPU基础设施,用于构建和扩展AI应用程序。