GLM-Image represents a significant advancement in AI image generation, combining autoregressive and diffusion architectures to push the boundaries of visual fidelity. For developers and businesses building AI-powered visual applications, deploying this model efficiently is crucial—but traditional setup processes involve complex dependencies, environment configuration, and infrastructure management.
Novita AI eliminates these barriers with pre-configured GPU templates that let you deploy GLM-Image in minutes rather than hours. This guide walks you through the complete deployment process, from template selection to running your first inference, plus optimization strategies for production workloads.
Whether you’re prototyping a content generation tool, building an e-commerce visualization platform, or integrating advanced image synthesis into your application, this tutorial provides everything you need to get GLM-Image running on enterprise-grade GPU infrastructure.
What is GLM-Image?
GLM-Image is an advanced image generation model that combines autoregressive and diffusion decoder architectures to deliver exceptional visual quality and fine-grained detail rendering. Developed by the ZAI team, this hybrid approach positions GLM-Image as a powerful alternative to traditional Latent Diffusion Models (LDM), particularly excelling in knowledge-intensive image generation scenarios.
The model’s unique architecture enables it to generate highly detailed images while maintaining competitive performance with industry-standard approaches. Whether you’re building AI-powered design tools, content creation platforms, or visual synthesis applications, GLM-Image offers both flexibility and precision through its text-to-image and image-to-image generation capabilities.
Key capabilities:
- Hybrid autoregressive + diffusion architecture for superior visual fidelity
- Text-to-image generation with detailed prompt understanding
- Image-to-image transformation and style transfer
- Multi-image conditional generation
- High-resolution output support (customizable dimensions)
For complete technical specifications and model documentation, visit the official GLM-Image repository.
Why Deploy GLM-Image on Novita AI?
Novita AI’s GPU infrastructure provides the ideal environment for running GLM-Image with pre-configured templates, instant deployment, and scalable computing resources. Unlike setting up local environments or managing cloud instances manually, Novita AI streamlines the entire deployment process from template selection to running inference.
Step-by-Step Deployment Guide
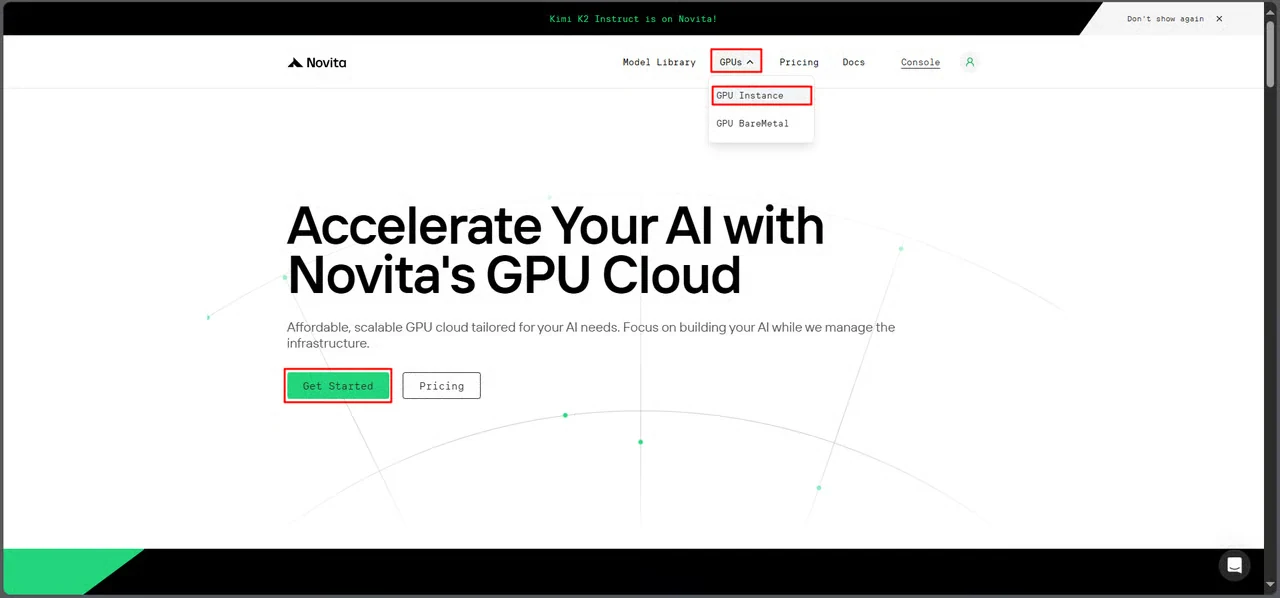
Step 1: Access GPU Console
Navigate to Novita AI’s GPU interface and click Get Started to enter the deployment management dashboard.
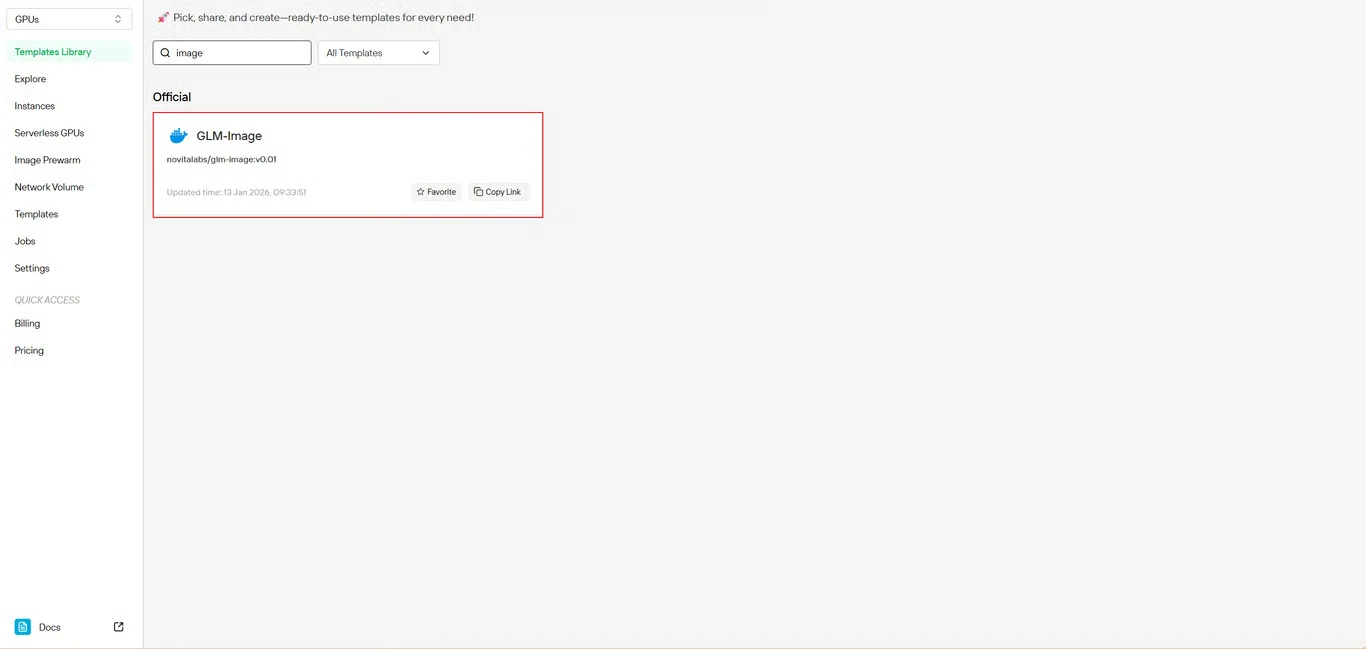
Step 2: Select GLM-Image Template
Locate GLM-Image in the template repository. Novita AI’s pre-built template includes all necessary dependencies, eliminating complex environment setup.
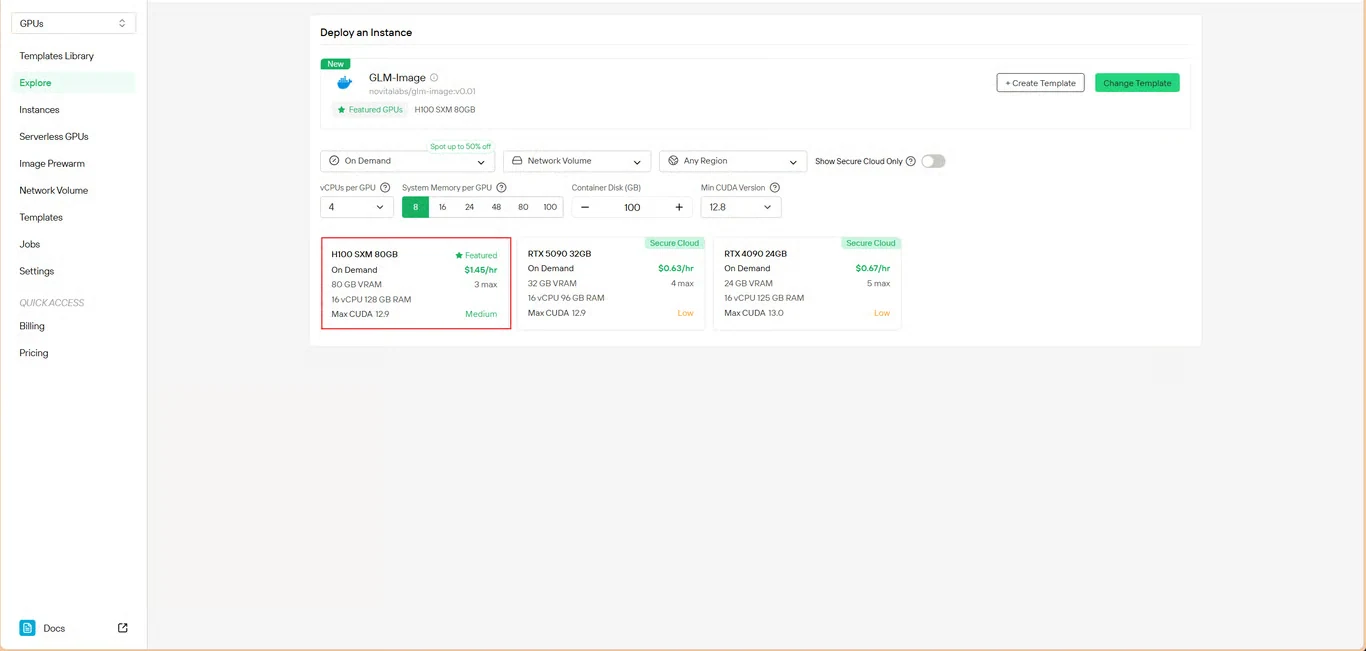
Step 3: Configure Infrastructure
Set your computing parameters:
- Memory allocation: Ensure sufficient VRAM for model weights
- Storage requirements: Allocate space for model files and generated images
- Network settings: Configure according to your access requirements
Click Deploy to proceed with your configuration.
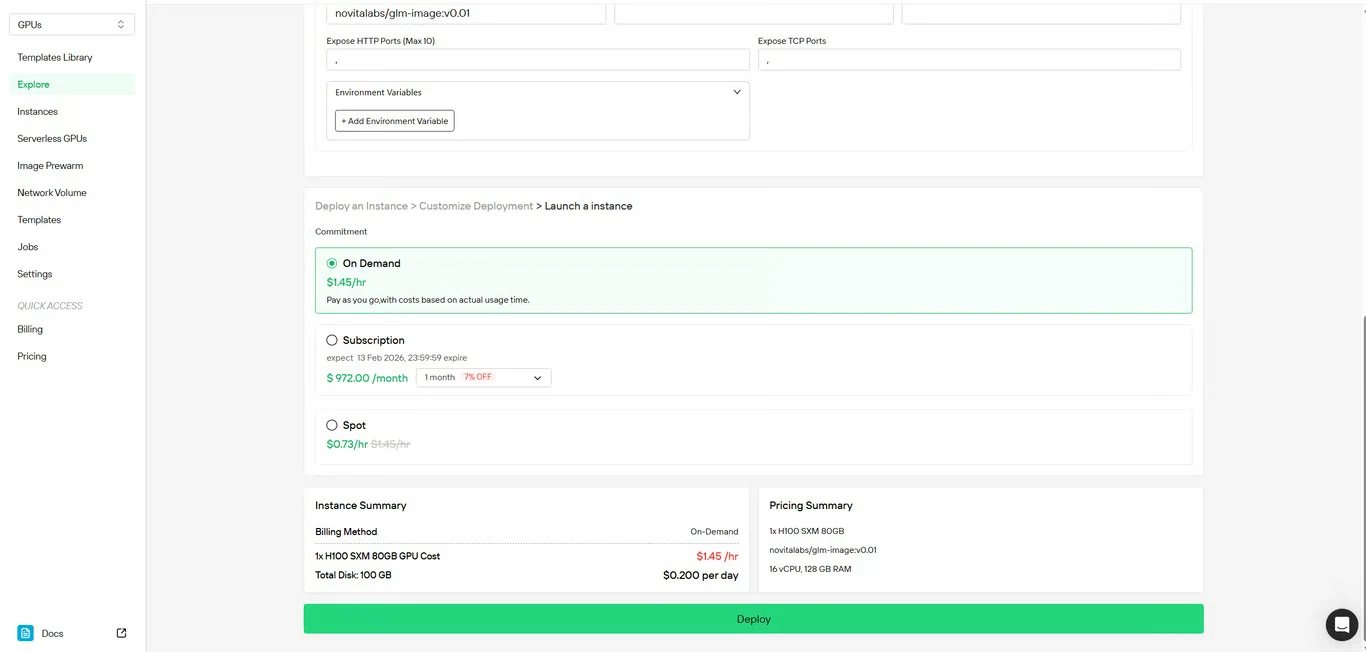
Step 4: Review Configuration
Double-check your setup details and cost summary. When satisfied, click Deploy to initiate instance creation.
Step 5: Monitor Deployment
The system automatically redirects you to the instance management page. Your GLM-Image instance will be created in the background—no manual intervention required.
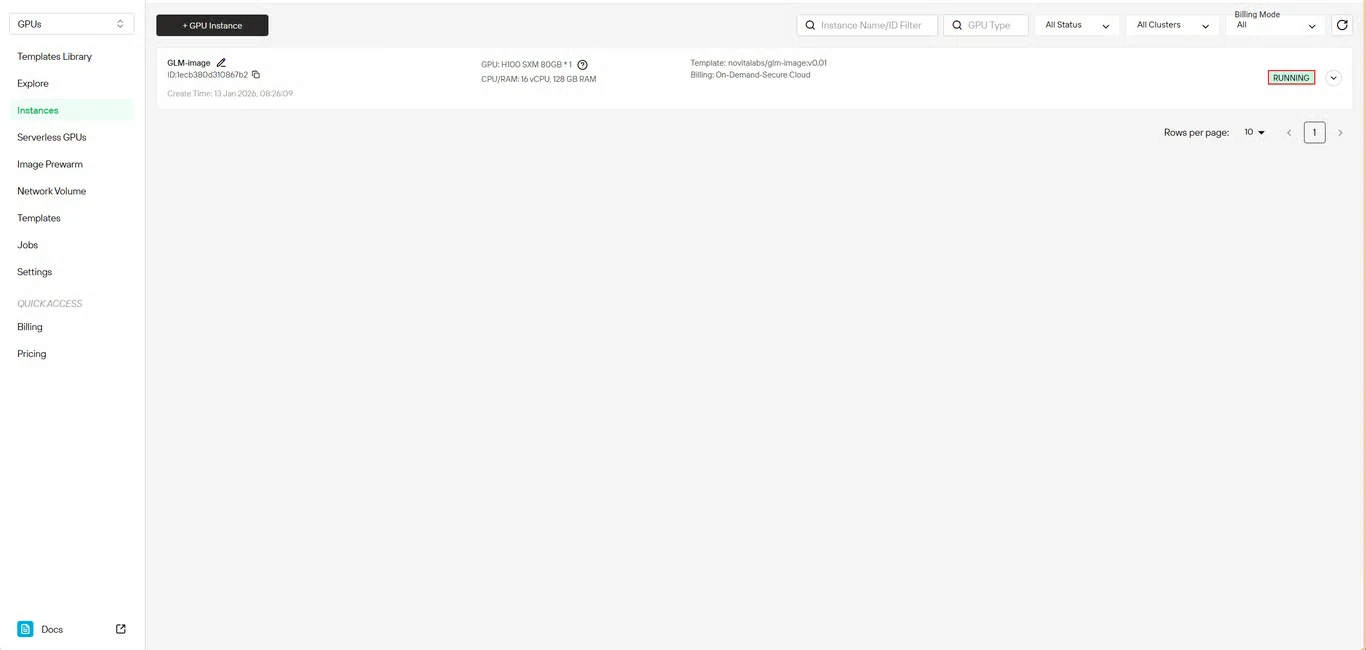
Step 6: Track Download Progress

Monitor the model download status in real-time. Your instance status will transition from Pulling to Running once deployment completes. Click the arrow icon next to your instance name for detailed progress information.
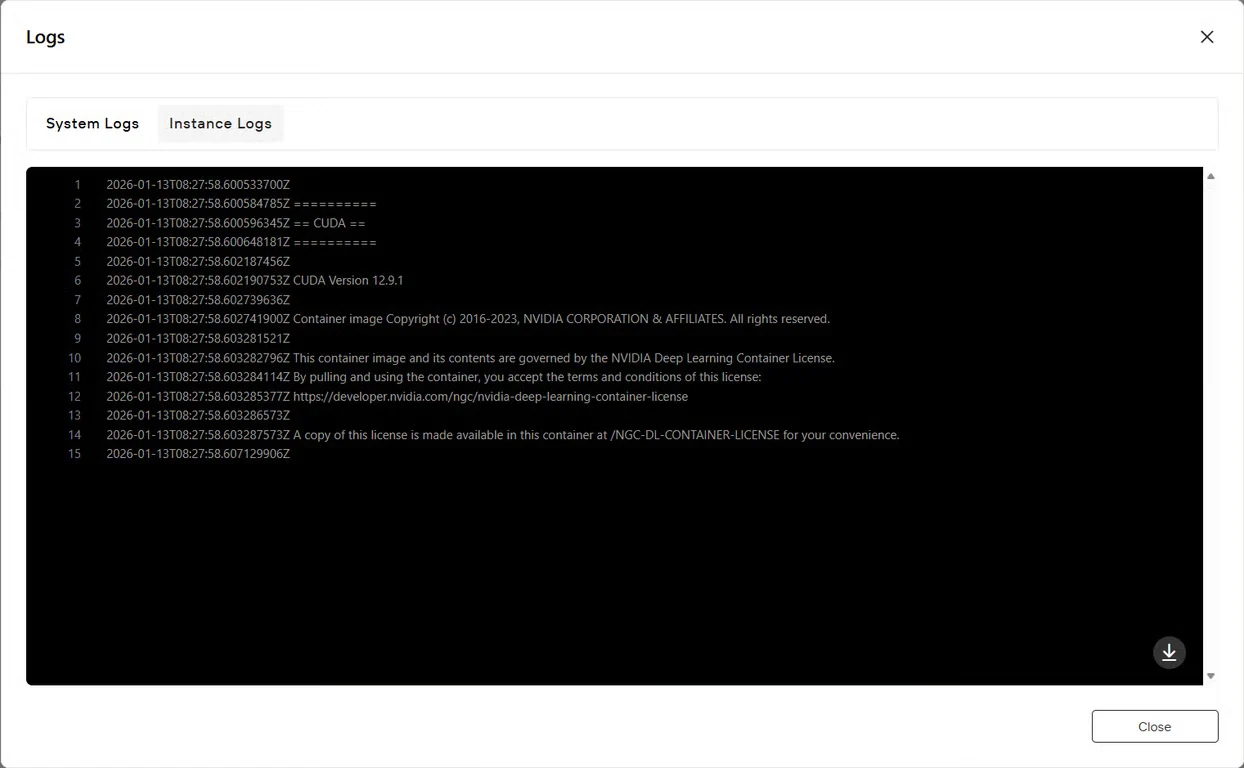
Step 7: Verify Service Status
Click the Logs button to view instance logs and confirm that the GLM-Image service has started successfully. Look for initialization confirmation messages indicating the model is ready for inference.
How to get started
example text2image.py
import torch
from diffusers.pipelines.glm_image import GlmImagePipeline
pipe = GlmImagePipeline.from_pretrained("zai-org/GLM-Image", torch_dtype=torch.bfloat16, device_map="cuda")
prompt = "A beautifully designed modern food magazine style dessert recipe illustration, themed around a raspberry mousse cake. The overall layout is clean and bright, divided into four main areas: the top left features a bold black title 'Raspberry Mousse Cake Recipe Guide', with a soft-lit close-up photo of the finished cake on the right, showcasing a light pink cake adorned with fresh raspberries and mint leaves; the bottom left contains an ingredient list section, titled 'Ingredients' in a simple font, listing 'Flour 150g', 'Eggs 3', 'Sugar 120g', 'Raspberry puree 200g', 'Gelatin sheets 10g', 'Whipping cream 300ml', and 'Fresh raspberries', each accompanied by minimalist line icons (like a flour bag, eggs, sugar jar, etc.); the bottom right displays four equally sized step boxes, each containing high-definition macro photos and corresponding instructions, arranged from top to bottom as follows: Step 1 shows a whisk whipping white foam (with the instruction 'Whip egg whites to stiff peaks'), Step 2 shows a red-and-white mixture being folded with a spatula (with the instruction 'Gently fold in the puree and batter'), Step 3 shows pink liquid being poured into a round mold (with the instruction 'Pour into mold and chill for 4 hours'), Step 4 shows the finished cake decorated with raspberries and mint leaves (with the instruction 'Decorate with raspberries and mint'); a light brown information bar runs along the bottom edge, with icons on the left representing 'Preparation time: 30 minutes', 'Cooking time: 20 minutes', and 'Servings: 8'. The overall color scheme is dominated by creamy white and light pink, with a subtle paper texture in the background, featuring compact and orderly text and image layout with clear information hierarchy."
image = pipe(
prompt=prompt,
height=32 * 32,
width=36 * 32,
num_inference_steps=30,
guidance_scale=1.5,
generator=torch.Generator(device="cuda").manual_seed(42),
).images[0]
image.save("output_t2i.png")
You can modify the prompt in text2image.py to run or use existing examples to run directly.
python3 text2image
$ python3 text2image.py
Couldn't connect to the Hub: Cannot reach https://huggingface.co/api/models/zai-org/GLM-Image: offline mode is enabled. To disable it, please unset the `HF_HUB_OFFLINE` environment variable..
Will try to load from local cache.
Loading checkpoint shards: 100%|████████████████████████████████████████████████████████████████████████████████████████████████████████████████████████████████████████████████████| 3/3 [00:02<00:00,  1.47it/s]
Loading weights: 100%|█████████████████████████████████████████████████████████████████████████████████████████████████████████████████████| 111/111 [00:00<00:00, 1391.52it/s, Materializing param=shared.weight]
Loading pipeline components...:  71%|██████████████████████████████████████████████████████████████████████████████████████████████████████▏                                        | 5/7 [00:02<00:00,  2.91it/s]Using a slow image processor as `use_fast` is unset and a slow processor was saved with this model. `use_fast=True` will be the default behavior in v4.52, even if the model was saved with a slow processor. This will result in minor differences in outputs. You'll still be able to use a slow processor with `use_fast=False`.
Loading weights: 100%|██████████████████████████████████████████████████████████████████████████████████████████| 1011/1011 [00:02<00:00, 359.59it/s, Materializing param=model.vqmodel.quantize.embedding.weight]
Loading pipeline components...: 100%|███████████████████████████████████████████████████████████████████████████████████████████████████████████████████████████████████████████████| 7/7 [00:07<00:00,  1.02s/it]
100%|█████████████████████████████████████████████████████████████████████████████████████████████████████████████████████████████████████████████████████████████████████████████| 30/30 [00:11<00:00,  2.69it/s]
output_t2i.png
example image2image.py
import torch
from diffusers.pipelines.glm_image import GlmImagePipeline
from PIL import Image

pipe = GlmImagePipeline.from_pretrained("zai-org/GLM-Image", torch_dtype=torch.bfloat16, device_map="cuda")
image_path = "cond.jpg"
prompt = "Replace the background of the snow forest with an underground station featuring an automatic escalator."
image = Image.open(image_path).convert("RGB")
image = pipe(
    prompt=prompt,
    image=[image],  # can input multiple images for multi-image-to-image generation such as [image, image1]
    height=33 * 32,
    width=32 * 32,
    num_inference_steps=30,
    guidance_scale=1.5,
    generator=torch.Generator(device="cuda").manual_seed(42),
).images[0]

image.save("output_i2i.png")
You can modify the prompt and image in text2image.py to run or use existing examples to run directly.
$ python3 image2image.py

Couldn't connect to the Hub: Cannot reach https://huggingface.co/api/models/zai-org/GLM-Image: offline mode is enabled. To disable it, please unset the `HF_HUB_OFFLINE` environment variable..
Will try to load from local cache.
Loading pipeline components...:   0%|                                                                                                                                                       | 0/7 [00:00<?, ?it/s]Using a slow image processor as `use_fast` is unset and a slow processor was saved with this model. `use_fast=True` will be the default behavior in v4.52, even if the model was saved with a slow processor. This will result in minor differences in outputs. You'll still be able to use a slow processor with `use_fast=False`.
Loading weights: 100%|██████████████████████████████████████████████████████████████████████████████████████████| 1011/1011 [00:02<00:00, 360.88it/s, Materializing param=model.vqmodel.quantize.embedding.weight]
Loading checkpoint shards: 100%|████████████████████████████████████████████████████████████████████████████████████████████████████████████████████████████████████████████████████| 3/3 [00:02<00:00,  1.46it/s]
Loading weights: 100%|█████████████████████████████████████████████████████████████████████████████████████████████████████████████████████| 111/111 [00:00<00:00, 1426.62it/s, Materializing param=shared.weight]
Loading pipeline components...: 100%|███████████████████████████████████████████████████████████████████████████████████████████████████████████████████████████████████████████████| 7/7 [00:07<00:00,  1.03s/it]
100%|███████████████████████████████████████████████████████████████████████████████████| 30/30 [00:10<00:00,  2.97it/s]
Use Cases for GLM-Image
GLM-Image’s hybrid architecture makes it particularly effective for:
- E-commerce: Product visualization and variant generation
- Marketing: Campaign creative and social media content
- Publishing: Editorial illustrations and infographics
- Design: Concept art and visual prototyping
- Education: Instructional diagrams and visual learning materials
The model’s strength in knowledge-intensive generation means it can accurately render complex scenes with specific requirements—ideal for projects demanding both creativity and precision.
Get Started with GLM-Image on Novita AI
Deploy GLM-Image on Novita AI’s GPU infrastructure today and access enterprise-grade image generation capabilities without the complexity of manual setup. Visit the GLM-Image template page to begin your deployment.
Novita AIis a leading AI cloud platform that provides developers with easy-to-use APIs and affordable, reliable GPU infrastructure for building and scaling AI applications.