The Model Context Protocol (MCP) is quickly becoming one of the most talked-about concepts in the world of AI. Despite being relatively new, it has already captured the attention of developers and major tech companies alike.
Created by Anthropic, MCP is an open standard protocol, similar to other protocols like HTTP. However, while HTTP is designed to connect users to resources via a server and a web browser (or HTTP client), MCP is designed to connect Large Language Models (LLMs) to external tools and data.
Let’s say you have a chatbot and want it to be able to access GitHub. You want your users to use the chatbot to create issues, close issues, add comments, or view existing pull requests. To enable your chatbot to perform all of these actions, it will need access to tools.
This is where an MCP server comes in.
The MCP server hosts several tools that the chatbot can call using its internal LLM to gain access to these capabilities. In the case of GitHub, we can use the official GitHub MCP server to perform all the tasks mentioned above.
In this article, we will be building a MCP server using the Novita API. With this MCP server, any application that supports the MCP protocol will be able to access all the LLMs available on Novita, generate images, create videos, and perform speech synthesis.
Understanding the MCP Architecture
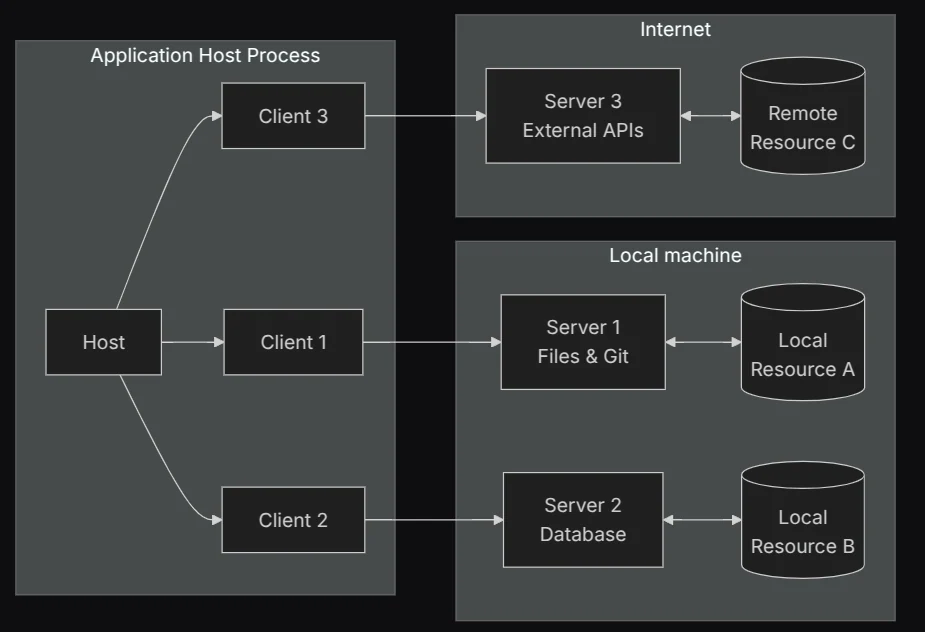
The MCP Architecture [source]
The MCP architecture is similar to a typical client-server setup. It has four important components:
- MCP Client
- MCP Server
- MCP Transports
- MCP Host
MCP Client
The MCP client serves as the communication gateway between the AI application and an MCP server. Once this communication is established, the application can access all the tools and resources the server possesses.
MCP Server
The MCP server hosts all of the tools and data that the client can provide to the AI application. It hosts the following:
- Tools
- Resources
- Prompts
Tools
Tools provide external capabilities to LLMs that they normally wouldn’t have, such as the ability to tell the time, update and read from a database, get the weather and more. These tools are essentially programmer-defined functions that can be called.
An MCP server can host several tools. These tools enable the LLM to function as an agent, due to the actions it can perform.
Tools are managed by the agent and may involve optional human supervision during use. They are similar to POST requests in the HTTP protocol because they perform side effects.
Resources
Resources are read-only pieces of information that provide data to the AI application. They are analogous to HTTP GET requests, as they aren’t meant to cause any side effects. Resources are intended to be managed by the application, which decides how users or the agent will interact with them. Examples of resources include file contents, API responses and records from databases.
Prompts
MCP servers can host prompt templates. These prompts enable the user to fetch prompts from the MCP server, which can then be used in the AI application. Prompts are managed by the user, who decides which prompts to provide to the agent.
All of these make up the MCP server. In this article, we will only implement tools, as they are the most widely used part of the MCP server.
MCP Transport
MCP transport refers to the method by which the MCP client communicates with the MCP server. This communication can occur locally, when both the client and server run on the same machine, or remotely, when they are on separate devices. MCP currently supports two main transport mechanisms:
- STDIO: In this mode, the MCP server and client run on the same machine and communicate through standard input and output.
- SSE: In this mode, the MCP server runs over HTTP. HTTP POST is used to send messages to the server, while Server-Sent Events are used to send messages from the server to the client.
- Streamable HTTP: This mode also uses HTTP but relies on HTTP GET and POST requests. It falls back to SSE only when it needs to stream multiple messages from the server to the client.
Standard Input/Output
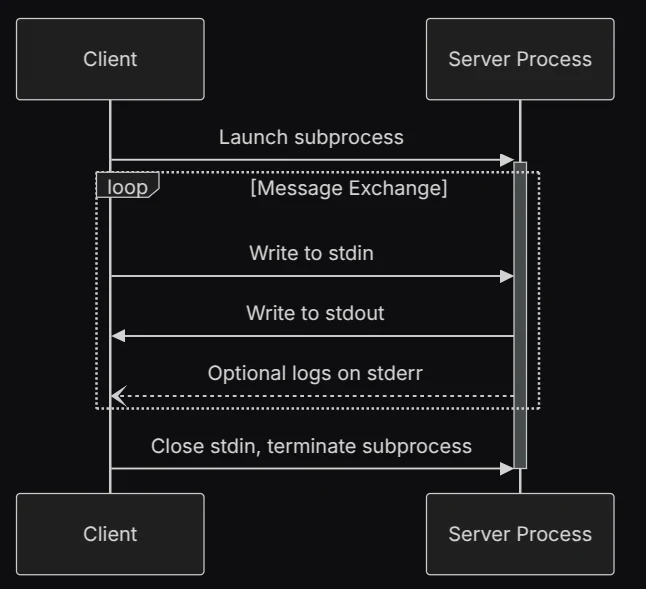
MCP Transport Using STDIO [source]
Caption: MCP Transport Using STDIO [source]
The MCP client and server can communicate via Standard Input and Output (STDIO). When using STDIO, both the client and server are running on the same machine. The client writes all requests to stdin, while the server writes the response to stdout.
Streamable HTTP
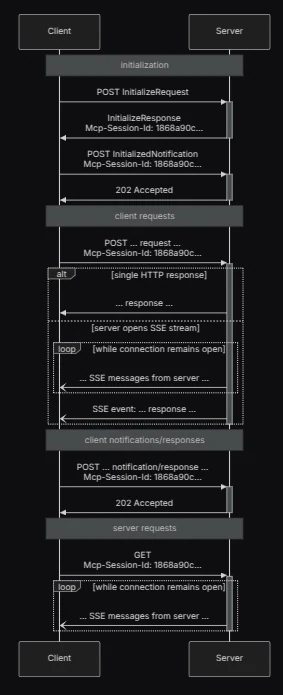
MCP Transport Using Streamable HTTP [source]
Streamable HTTP allows the MCP client and server to communicate over HTTP. It uses the HTTP POST method to send requests from the client and receive responses from the server. When needed, it can optionally switch to Server-Sent Events (SSE) to stream messages from the server to the client.
Streamable HTTP is well-suited for remote communication between a client and server and serves as the replacement for the deprecated MCP SSE transport.
MCP HOST
Where MCP differs from typical client-server architecture is in the role of the host. The MCP specification defines it as a client-host-server-architecture. This is because the client and host make up the frontend of the architecture. The MCP host consists of two important components:
- The MCP client(s)
- A large language model
The job of the MCP client is to fetch tools, resources, and prompts that the LLM requires from the server. Once the resources have been collected, they are placed within the model’s context. A single MCP host can have multiple clients, each connected to its own individual MCP server.
The MCP host can also be considered the application the user is working on, which may perform other functions. For instance, Claude Desktop is an MCP host that functions as a chatbot, Cursor is an MCP host that also serves as an IDE, and Claude Code is an MCP host designed as an AI coding agent.
Working with an MCP Server
Before we get into building our MCP server, let’s see how we can work with an existing MCP server. We’ll use the Python MCP SDK to interact with the novita-mcp-server.
At the time of writing this article, the novita-mcp-server provides the following tools:
- A tool to list all the Novita clusters
- A tool to list the Novita GPU instance products
- A tool to list all the running GPU instances
- A tool to create new GPU instances
Let’s confirm this by writing a simple script that connects to the MCP server via STDIO and lists all the tools available on the server.
To begin, let’s install the MCP SDK: pip install “mcp[cli]”
After we have installed the SDK, we can create a file called client.py. Then, we will make all the necessary imports:
from mcp import ClientSession, StdioServerParameters
from mcp.client.stdio import stdio_client
import os
We will then use the StdioServerParameters to set our parameters to launch our MCP server via stdio. The novita-mcp-server is implemented in Node.js, so to use it, we need to run it with the npx command. We also need to store our Novita API key in the environment variable NOVITA_API_KEY.
# Create server parameters for stdio connection
server_params = StdioServerParameters(
   command="npx",
   args=["-y", "@novitalabs/novita-mcp-server"],
   env={"NOVITA_API_KEY":  os.environ["NOVITA_API_KEY"]},
)
Next, let’s create an asynchronous function. Within the function, we will pass the server parameters to the stdio_client function, which will create a context that returns read and write streams. These streams enable us to read from and write to stdio, respectively.
async def run():
   async with stdio_client(server_params) as (read, write):
       async with ClientSession(read, write) as session:
           # Initialize the connection
           await session.initialize()

           # List available tools
           tools = await session.list_tools()
           print("Available tools:", tools)
These streams are then used to create a session with the ClientSession class. Once we have created our session, we can initialize it and then list all the tools on the server.
To run this program, we just need to use the asyncio library to call the run function. Here’s the full code:
from mcp import ClientSession, StdioServerParameters
from mcp.client.stdio import stdio_client
import os

# Create server parameters for stdio connection
server_params = StdioServerParameters(
   command="npx",
   args=["-y", "@novitalabs/novita-mcp-server"],
   env={"NOVITA_API_KEY":  os.environ["NOVITA_API_KEY"]},
)

async def run():
   async with stdio_client(server_params) as (read, write):
       async with ClientSession(read, write) as session:
           # Initialize the connection
           await session.initialize()

           # List available tools
           tools = await session.list_tools()
           print("Available tools:", tools)

if __name__ == "__main__":
   import asyncio

   asyncio.run(run())
By executing the script, we can see all the tools on the Novita MCP server.
This example demonstrates how you can use the MCP client. We could add an LLM to this example and effectively transform it into a host, but that is not the focus of this tutorial. The focus is to build an MCP server.
Building an MCP Server with FastMCP
In the Python MCP SDK, there are two ways to build MCP servers. One method is by using the low-level server, and the other is by using FastMCP. FastMCP is a class within the MCP Python SDK that draws inspiration from FastAPI to make it easier to create MCP servers.
Let’s use FastMCP to create our MCP server. Before we get started, let’s consider the functionalities of our MCP server. The current Novita MCP server only implements tools that handle GPU management. Let’s try to build a server around the Novita API that goes beyond GPU management.
Instead, let’s build an MCP server that provides access to the models on the Novita platform. Our MCP server will only have tools, with no resources or prompts. Here is a list of tools the server will have:
- list_models: This tool will list all the large language models on the Novita platform.
- get_model: This tool will retrieve and use a specific large language model.
- text2image: This tool will generate images from a given prompt.
- task_result: This tool will be used to get the status of a running task via its ID.
- text_to_speech: This tool will convert the provided text into speech.
- generate_video: This tool will generate a video from a given prompt.
Now that we know the tools we will be building, let’s start creating our server. First, create a file called server.py and add the following code to it:
import os
import sys
from mcp.server.fastmcp import FastMCP
import requests
import uvicorn
from starlette.applications import Starlette
from starlette.routing import Mount

base_url = "https://api.novita.ai/v3"

headers = {
   "Content-Type": "application/json",
   "Authorization": f"Bearer {os.environ['NOVITA_API_KEY']}"
}

mcp = FastMCP("Novita_API")
With this, we have imported the necessary modules, defined our base URL and headers for the API, and created an instance of the FastMCP class. Let’s move on to creating our tools.
List models
To create a tool in FastMCP, we need to decorate a function with the tool method from the FastMCP instance. The list_models function makes a call to the list models endpoint to get the list of models. The response is then properly formatted so it can be passed to the LLM that called it.
@mcp.tool()
def list_models() -> str:
   """
   List all available models from the Novita API.
   """

   url = base_url + "/openai/models"

   response = requests.request("GET", url, headers=headers)
   data = response.json()["data"]

   text = ""
   for i, model in enumerate(data, start=1):
       text += f"Model id: {model['id']}\
"
       text += f"Model description: {model['description']}\
"
       text += f"Model type: {model['model_type']}\
\
"

   return text
The docstring in the tool serves as a way to describe the tool’s functionality so the LLM can understand what the tool is used for.
Get models
This tool is used to access the deployed LLMs on Novita. It takes in the model ID and the prompt for the model. It uses the Novita chat completions API endpoint.
@mcp.tool()
def get_model(model_id: str, message):
   """
   Provide a model ID and a message to get a response from the Novita API.
   """

   url = base_url + "/openai/chat/completions"

   payload = {
       "model": model_id,
       "messages": [
           {
               "content": message,
               "role": "user",
           }
       ],
       "max_tokens": 200,
       "response_format": {
           "type": "text",
       },
   }

   response = requests.request("POST", url, json=payload, headers=headers)

   content = response.json()["choices"][0]["message"]["content"]

   return content
Text2Image
This tool generates images from a prompt. It uses the Novita text-to-image endpoint under the hood. This endpoint is asynchronous, so it doesn’t return the image immediately; rather, it returns a task ID.
@mcp.tool()
def text2Image(prompt):
   """
   Generate an image from a text prompt using the Novita API.
   """

   url = base_url + "/async/txt2img"

   payload = {
       "request": {
           "model_name": "sd_xl_base_1.0.safetensors",
           "prompt": prompt,
           "width": 1024,
           "height": 1024,
           "image_num": 1,
           "steps": 20,
           "clip_skip": 1,
           "sampler_name": "Euler a",
           "guidance_scale": 7.5,
       },
       "extra": {
           "response_image_type": "jpeg"
       }
   }

   response = requests.request("POST", url, json=payload, headers=headers)

   return response.json()["task_id"]
Task result
This tool is used to get the status of an ongoing task on the Novita API. It takes in only the task ID. For example, the Image tool generates an image asynchronously and returns a task ID to the host. The user can then ask the host to retrieve the result of that task using the Task Result tool.
@mcp.tool()
def task_result(task_id: str):
   """
   Get the current status of a running task using it's task id
   """

   url = base_url + f'/async/task-result?task_id={task_id}'

   response = requests.request("GET", url, headers=headers)
   return response.json()
Generate Video
This tool generates videos using the Novita API’s Kling AI V1.6 Text-to-Video endpoint. Just like the Image tool, it generates videos asynchronously and returns a task ID.
@mcp.tool()
def generateVideo(prompt: str):
   """
   Generate an image using a prompt
   """

   url = base_url + "/async/kling-v1.6-t2v"

   payload = {
       "mode": "Standard",
       "prompt": prompt,
       "negative_prompt": "low quality",
       "guidance_scale": 0.6
   }

   response = requests.post(url, json=payload, headers=headers)

   return response.json()
Text To Speech
This tool generates speech using the Novita API Text-to-Speech endpoint. It is also an asynchronous endpoint, so it returns a task ID as well.
@mcp.tool()
def textToSpeech(text, voice_id) -> str:
   """
   Generate speech using text and voice id.
   It returns the task id of the generated speech.

   The available voice ids are:
   - Emily
   - James
   - Olivia
   - Michael
   - Sarah
   - John
   """

   url = base_url + "/async/txt2speech"

   payload = {
       "request": {
           "voice_id": voice_id,
           "language": "en-US",
           "texts": [text]
       }
   }

   response = requests.post(url, json=payload, headers=headers)

   return response.json()["task_id"]
With all our tools defined, we can then set up our transport mechanism. We are going to use stdio.
if __name__ == "__main__":
   # Run using stdio transport
   mcp.run(transport="stdio")
We can now put all the code together:
import os
import sys

from mcp.server.fastmcp import FastMCP

import requests

import uvicorn

from starlette.applications import Starlette
from starlette.routing import Mount

base_url = "https://api.novita.ai/v3"

headers = {
   "Content-Type": "application/json",
   "Authorization": f"Bearer {os.environ['NOVITA_API_KEY']}"
}

mcp = FastMCP("Novita_API")

@mcp.tool()
def list_models() -> str:
   """
   List all available models from the Novita API.
   """

   url = base_url + "/openai/models"

   response = requests.request("GET", url, headers=headers)
   data = response.json()["data"]

   text = ""
   for i, model in enumerate(data, start=1):
       text += f"Model id: {model['id']}\
"
       text += f"Model description: {model['description']}\
"
       text += f"Model type: {model['model_type']}\
\
"

   return text

@mcp.tool()
def get_model(model_id: str, message) -> str:
   """
   Provide a model ID and a message to get a response from the Novita API.
   """

   url = base_url + "/openai/chat/completions"

   payload = {
       "model": model_id,
       "messages": [
           {
               "content": message,
               "role": "user",
           }
       ],
       "max_tokens": 200,
       "response_format": {
           "type": "text",
       },
   }

   response = requests.request("POST", url, json=payload, headers=headers)

   content = response.json()["choices"][0]["message"]["content"]

   return content

@mcp.tool()
def text2Image(prompt: str) -> str:
   """
   Generate an image from a text prompt using the Novita API.
   """

   url = base_url + "/async/txt2img"

   payload = {
       "request": {
           "model_name": "sd_xl_base_1.0.safetensors",
           "prompt": prompt,
           "width": 1024,
           "height": 1024,
           "image_num": 1,
           "steps": 20,
           "clip_skip": 1,
           "sampler_name": "Euler a",
           "guidance_scale": 7.5,
       },
       "extra": {
           "response_image_type": "jpeg"
       }
   }

   response = requests.request("POST", url, json=payload, headers=headers)

   return response.json()["task_id"]

@mcp.tool()
def task_result(task_id: str) -> str:
   """
   Get the current status of a running task using it's task id
   """

   url = base_url + f'/async/task-result?task_id={task_id}'

   response = requests.request("GET", url, headers=headers)
   return response.json()

@mcp.tool()
def generateVideo(prompt: str) -> str:
   """
   Generate an image using a prompt
   """

   url = base_url + "/async/kling-v1.6-t2v"

   payload = {
       "mode": "Standard",
       "prompt": prompt,
       "negative_prompt": "low quality",
       "guidance_scale": 0.6
   }

   response = requests.post(url, json=payload, headers=headers)

   return response.json()["task_id"]

@mcp.tool()
def textToSpeech(text, voice_id) -> str:
   """
   Generate speech using text and voice id.
   It returns the task id of the generated speech.

   The available voice ids are:
   - Emily
   - James
   - Olivia
   - Michael
   - Sarah
   - John
   """

   url = base_url + "/async/txt2speech"

   payload = {
       "request": {
           "voice_id": voice_id,
           "language": "en-US",
           "texts": [text]
       }
   }

   response = requests.post(url, json=payload, headers=headers)

   return response.json()["task_id"]

if __name__ == "__main__":
   # Run using stdio transport
   mcp.run(transport="stdio")
We can test our MCP server on any MCP host, such as Claude Desktop, Cursor or VS Code, using the following setup. For step-by-step instructions on registering servers in Claude Code via claude mcp add or in Claude Desktop via the JSON config file, see Claude MCP: How to Configure MCP Servers in Claude Code and Claude Desktop.
{
     "command": "python",
     "args": [
       "path/to/server.py"
     ],
     "env": {
       "NOVITA_API_KEY": "sk_...."
     }
   }
We can also use the client script we developed earlier to test our server.
Using the MCP Low-Level Server
The server we built in the previous section utilizes the FastMCP class, which provides a high-level interface for building MCP servers. You can also build MCP servers using the low-level server, which gives you granular control over the MCP protocol. Let’s see how we can modify the server from the previous section to use the low-level server.
Tool Management
One of the things FastMCP does is manage the tools you define. When you decorate a function with the tool decorator of the FastMCP class, FastMCP adds that tool to a list. When the agent requests that tool, FastMCP fetches it, calls it, and then sends the result back to the agent.
With the low-level server, we can manage this process ourselves using the call_tool decorator.
@app.call_tool()
async def manage_tool(name: str, arguments: dict ) -> list[types.TextContent]:
   if name == "list_models":
       return await list_models_tool()

   if name == "get_model":
       return await get_model_tool(arguments)

   else:
       raise ValueError(f"Unknown tool: {name}")
The code above shows a function that has been decorated with the call_tool method. When the agent calls a tool, it passes the name of the tool and any arguments the tool expects. Using the name of the function, we can then determine which tool the agent wishes to call and execute it.
We also get to manage the listing of the tools using the low-level server, unlike FastMCP, which does this automatically when a function has been decorated with the tool method.
@app.list_tools()
async def list_tools() -> list[types.Tool]:
   return [
       types.Tool(
           name="list_models",
           description="List all available models from the Novita API.",
           inputSchema={"type": "object", "properties": {}},
       ),
       types.Tool(
           name="get_model",
           description="Provide a model ID and a message to get a response from the Novita API.",
           inputSchema={
               "type": "object",
               "required": ["model_id", "message"],
               "properties": {
                   "model_id": {
                       "type": "string",
                       "description": "The ID of the model to use.",
                   },
                   "message": {
                       "type": "string",
                       "description": "The input message to send.",
                   },
               },
           },
       ),
   ]
Here’s the full low-level server code. It contains two tools and can communicate with the client via standard input and output.
import os
import asyncio
import requests
from mcp.server.lowlevel import Server
from mcp.server.stdio import stdio_server
import mcp.types as types

base_url = "https://api.novita.ai/v3"

headers = {
   "Content-Type": "application/json",
   "Authorization": f"Bearer {os.environ['NOVITA_API_KEY']}"
}

app = Server("Novita_API")

async def list_models_tool():
   """
   Lists all available models from the Novita API.
   """
   url = base_url + "/openai/models"
   response = requests.get(url, headers=headers)
   data = response.json()["data"]

   text = ""
   for i, model in enumerate(data, start=1):
       text += f"Model id: {model['id']}\
"
       text += f"Model description: {model['description']}\
"
       text += f"Model type: {model['model_type']}\
\
"

   return [types.TextContent(type="text", text=text)]

async def get_model_tool(arguments: dict):
   """
   Given a model ID and a user message, fetch a response from the Novita API.
   """
   model_id = arguments.get("model_id")
   message = arguments.get("message")

   if not model_id or not message:
       raise ValueError("Both 'model_id' and 'message' are required.")

   url = base_url + "/openai/chat/completions"

   payload = {
       "model": model_id,
       "messages": [
           {
               "content": message,
               "role": "user",
           }
       ],
       "max_tokens": 200,
       "response_format": {
           "type": "text",
       },
   }

   response = requests.post(url, json=payload, headers=headers)
   content = response.json()["choices"][0]["message"]["content"]
   return [types.TextContent(type="text", text=content)]

@app.call_tool()
async def manage_tool(name: str, arguments: dict ) -> list[types.TextContent]:
   if name == "list_models":
       return await list_models_tool()

   if name == "get_model":
       return await get_model_tool(arguments)

   else:
       raise ValueError(f"Unknown tool: {name}")

@app.list_tools()
async def list_tools() -> list[types.Tool]:
   return [
       types.Tool(
           name="list_models",
           description="List all available models from the Novita API.",
           inputSchema={"type": "object", "properties": {}},
       ),
       types.Tool(
           name="get_model",
           description="Provide a model ID and a message to get a response from the Novita API.",
           inputSchema={
               "type": "object",
               "required": ["model_id", "message"],
               "properties": {
                   "model_id": {
                       "type": "string",
                       "description": "The ID of the model to use.",
                   },
                   "message": {
                       "type": "string",
                       "description": "The input message to send.",
                   },
               },
           },
       ),
   ]

async def main():
   async with stdio_server() as streams:
       await app.run(streams[0], streams[1], app.create_initialization_options())

if __name__ == "__main__":
   asyncio.run(main())
The low-level server doesn’t just give you fine-grained control over tool management; it also provides low-level control over resources, prompts, and other parts of the MCP protocol, such as lifecycle management.
Conclusion
In this tutorial, we built an MCP server that uses the Novita API to enhance the capabilities of any MCP host. You’ve learned the basics of what it takes to create an MCP server, including how to define and expose tools.
With this foundation, you can begin exploring more advanced topics such as authentication, deploying remote MCP servers, and working directly with the low-level Python implementation.
We also explored the Novita API itself and saw its capabilities, from a diverse set of language models to generation tools for video, audio, and images. Visit the Novita LLM Playground to try out other API we didn’t get to cover as well, such as the image and face editor endpoints.
Novita AI is an AI cloud platform that offers developers an easy way to deploy AI models using our simple API, while also providing the affordable and reliable GPU cloud for building and scaling.