Modern “agentic coding” is more than autocomplete—it’s an AI workflow that can plan changes, edit multiple files, run commands/tests, and iterate until the build is green. That’s exactly the experience OpenCode is built for: an open-source AI coding agent you can use in the terminal (CLI/TUI), as a desktop app, or as an IDE extension.
In this guide, you’ll learn how to run GLM-4.7 inside OpenCode using Novita AI’s OpenAI-compatible API. GLM-4.7 is positioned as a flagship model with upgrades for advanced coding and reliable multi-step reasoning/execution—a strong match for OpenCode’s plan → build → verify loop.
💡By the end, you’ll have:
- OpenCode installed and ready to use across your preferred interface (terminal/desktop/IDE).
- GLM-4.7 connected in OpenCode via the built-in Novita provider (OpenAI-compatible). You’ll select GLM-4.7 and start coding right away.
- A first end-to-end project built with an agentic workflow (implementation + tests + documentation).
What is OpenCode?
OpenCode is an open-source AI coding agent that you can run in multiple developer environments—most commonly as a terminal-based interface ( CLI + TUI), but also as a desktop app or an IDE extension.
What you use it for
OpenCode is built to help you move from “idea → working code” faster by acting like a lightweight coding teammate that can:
- Understand a repo and follow instructions across multiple files
- Generate new code, refactor existing code, and help debug issues
- Work in a “chat-like” loop inside your terminal (TUI) or via commands (CLI)
What is the difference between OpenCode and Claude Code
OpenCode and Claude Code are both terminal-based AI coding agents, but they take different paths.
- OpenCode is an open-source, provider-agnostic agent: it highlights support for “75+ LLM providers through Models.dev (including local models)” and positions itself as a flexible tool you can wire to different model backends.
- Claude Code, by contrast, is Anthropic’s official Claude-first CLI—a command-line tool to access Claude models in the terminal—plus an official ecosystem for extensions (plugins) and tool/data connections via MCP (Model Context Protocol).
Quick comparison table
| Aspect | OpenCode | Claude Code |
| Positioning | Open-source, multi-model terminal coding agent | Anthropic’s official Claude-first terminal coding agent |
| Model / provider choice | 75+ LLM providers through Models.dev,” incl. local models | Built around Claude; extends via MCP + plugins |
| GitHub automation | /opencode or /oc comment triggers; runs on GitHub Actions runner | Extensions focus on plugins/MCP (official ecosystem) |
| Pricing entry point | Tool is open-source; cost depends on your chosen model backend | Claude plans (Pro/Max/Team/Enterprise) on official pricing page |
Why GLM-4.7?
GLM-4.7 is positioned as a flagship model optimized for Agentic Coding, meaning it’s designed to perform better in workflows where a coding agent must plan, use tools, and complete multi-step tasks reliably.
Built for “agent-style” development (planning + tools + delivery)
According to the official model documentation, GLM-4.7 emphasizes:
- Stronger coding ability, including better performance in terminal-agent scenarios and a more consistent “think then act” workflow in coding frameworks
- Improved long-horizon task planning and tool coordination (critical for repo-level refactors, bug-fix loops, and multi-file changes)
- Stronger instruction following during tool use and better end-to-end task completion efficiency in agentic workflows
This aligns extremely well with how OpenCode is used: you typically ask it to implement a change, run commands/tests, iterate on failures, and finalize deliverables.
Big context + big output: better for real repos
For coding agents, context window and output limits matter because you often need to load:
- project structure + key files + configs
- logs/test failures
- multiple iterations of patches
GLM-4.7 is documented with a 200K context window and up to 128K max output tokens, which is especially useful when you’re dealing with large repos or need the model to generate substantial code and documentation in one pass.
Tooling readiness (Function Calling + MCP)
Agentic coding is not just text generation—it often requires structured tool calls and integrations. GLM-4.7’s docs highlight support for Function Call, structured outputs (e.g., JSON ), and MCP connectivity for tool/data access, which can improve reliability when an agent needs to “do” things, not just “say” things.
Bonus: higher-quality frontend generation
If your OpenCode workflows include UI scaffolding or frontend iteration, GLM-4.7’s documentation explicitly calls out improvements in frontend aesthetic quality (useful for generating cleaner UI code and more presentable results).
How to Install OpenCode
OpenCode provides a few installation options. The quickest is the one-line install script, and the most portable is installing the npm package (opencode-ai).
macOS / Linux
Recommended
curl -fsSL https://opencode.ai/install | bashOr (cross-platform)
npm install -g opencode-ai
# or
bun add -g opencode-ai
Start:
opencodeWindows
Recommended
npm install -g opencode-ai
# or
bun add -g opencode-ai
curl | bashrequires a bash environment (WSL or Git Bash). In PowerShell/CMD, use npm/bun.
Start:
opencodeHow to Use GLM 4.7 in OpenCode
Getting Your API Key on Novita AI
- Step 1: Create or Login to Your Account
Visit [https://novita.ai](https://novita.ai) and sign up or log in to your existing account
- Step 2: Navigate to Key Management
After logging in, find “API Keys”
- Step 3: Create a New Key
Click the “Add New Key” button.
- Step 4: Save Your Key Immediately
Copy and store the key as soon as it is generated; it is usually shown only once and cannot be retrieved later. Keep the key in a secure location such as a password manager or encrypted notes
Add your Novita API key to OpenCode
- Launch OpenCode:
opencode- In the OpenCode prompt, run:
/connect- Search and select Novita AI, then paste your Novita API key.
- Select GLM-4.7
Build Your First Project : Hit the Key!
For a live demo, a tiny terminal game is often more compelling than a web API—you can see the loop happen in real time: spec → generate → run → iterate → ship. In this section, we’ll build a minimal reaction-time mini-game called “Hit the Key”.
The idea is simple: the game shows a random A–Z letter for 10 rounds. You type the letter and press Enter. We measure reaction time; anything slower than 1.2s counts as a miss. At the end, the game prints a score table and persists the best result to highscore.json.
Switch to Build mode and execute
Press Tab to switch into Build mode (tools enabled). Then paste the execution prompt below.
Prompt
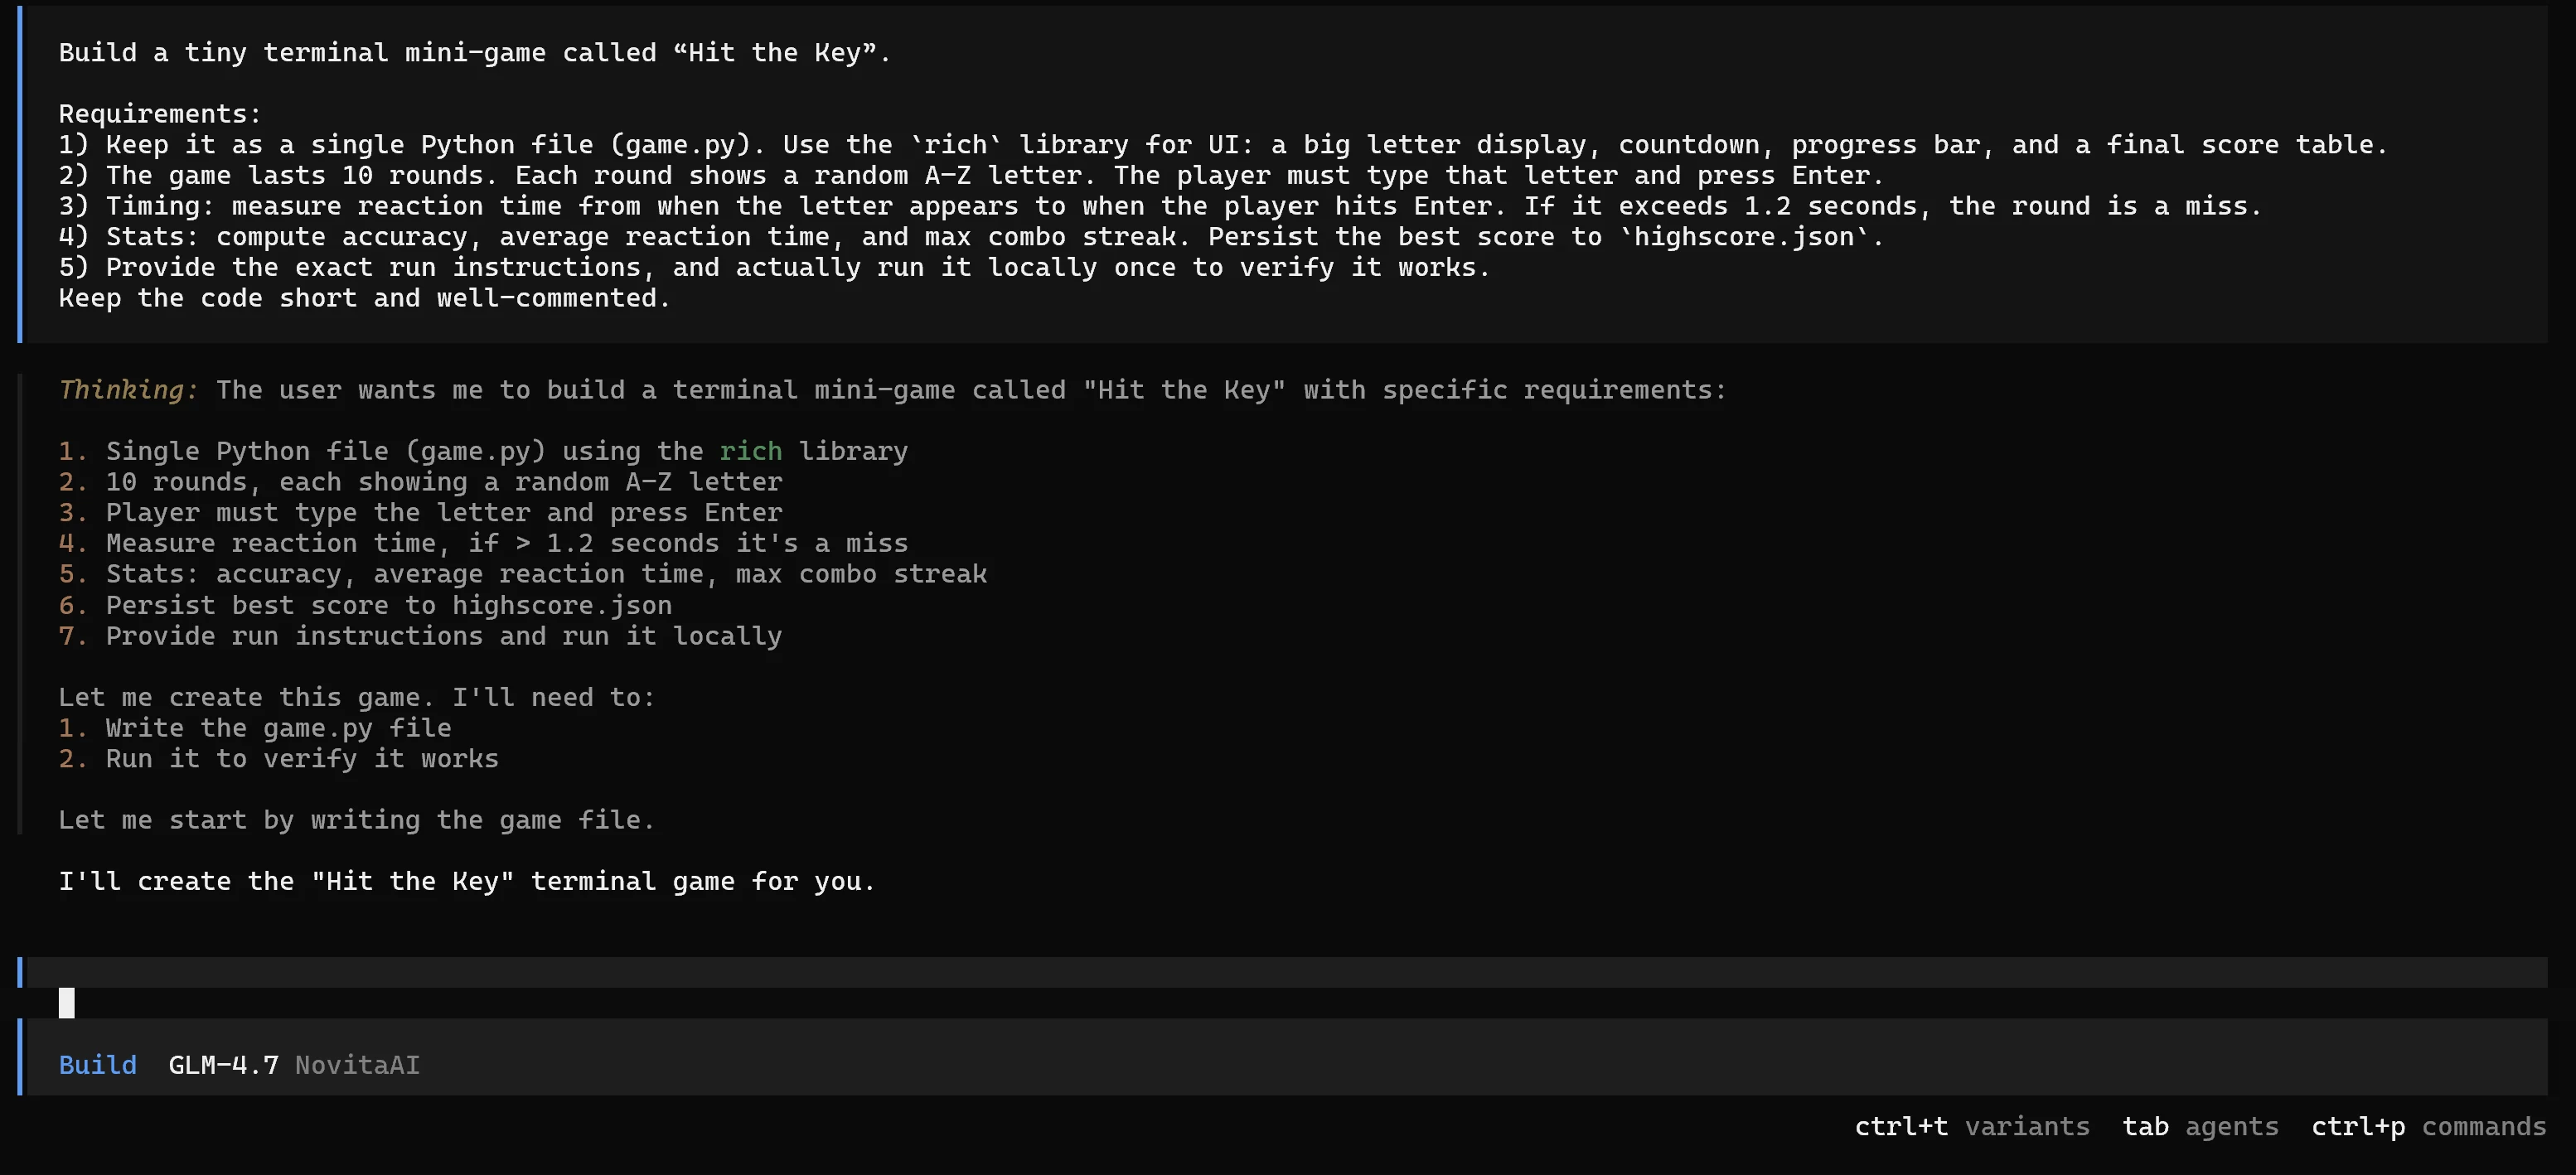
Build a tiny terminal mini-game called “Hit the Key”. Requirements:
- Keep it as a single Python file (game.py). Use the
richlibrary for UI: a big letter display, countdown, progress bar, and a final score table.- The game lasts 10 rounds. Each round shows a random A–Z letter. The player must type that letter and press Enter.
- Timing: measure reaction time from when the letter appears to when the player hits Enter. If it exceeds 1.2 seconds, the round is a miss.
- Stats: compute accuracy, average reaction time, and max combo streak. Persist the best score to
highscore.json.- Provide the exact run instructions, and actually run it locally once to verify it works. Keep the code short and well-commented.
Run locally and verify the experience
Once the agent finishes generating game.py, run it locally:
py -m pip install rich
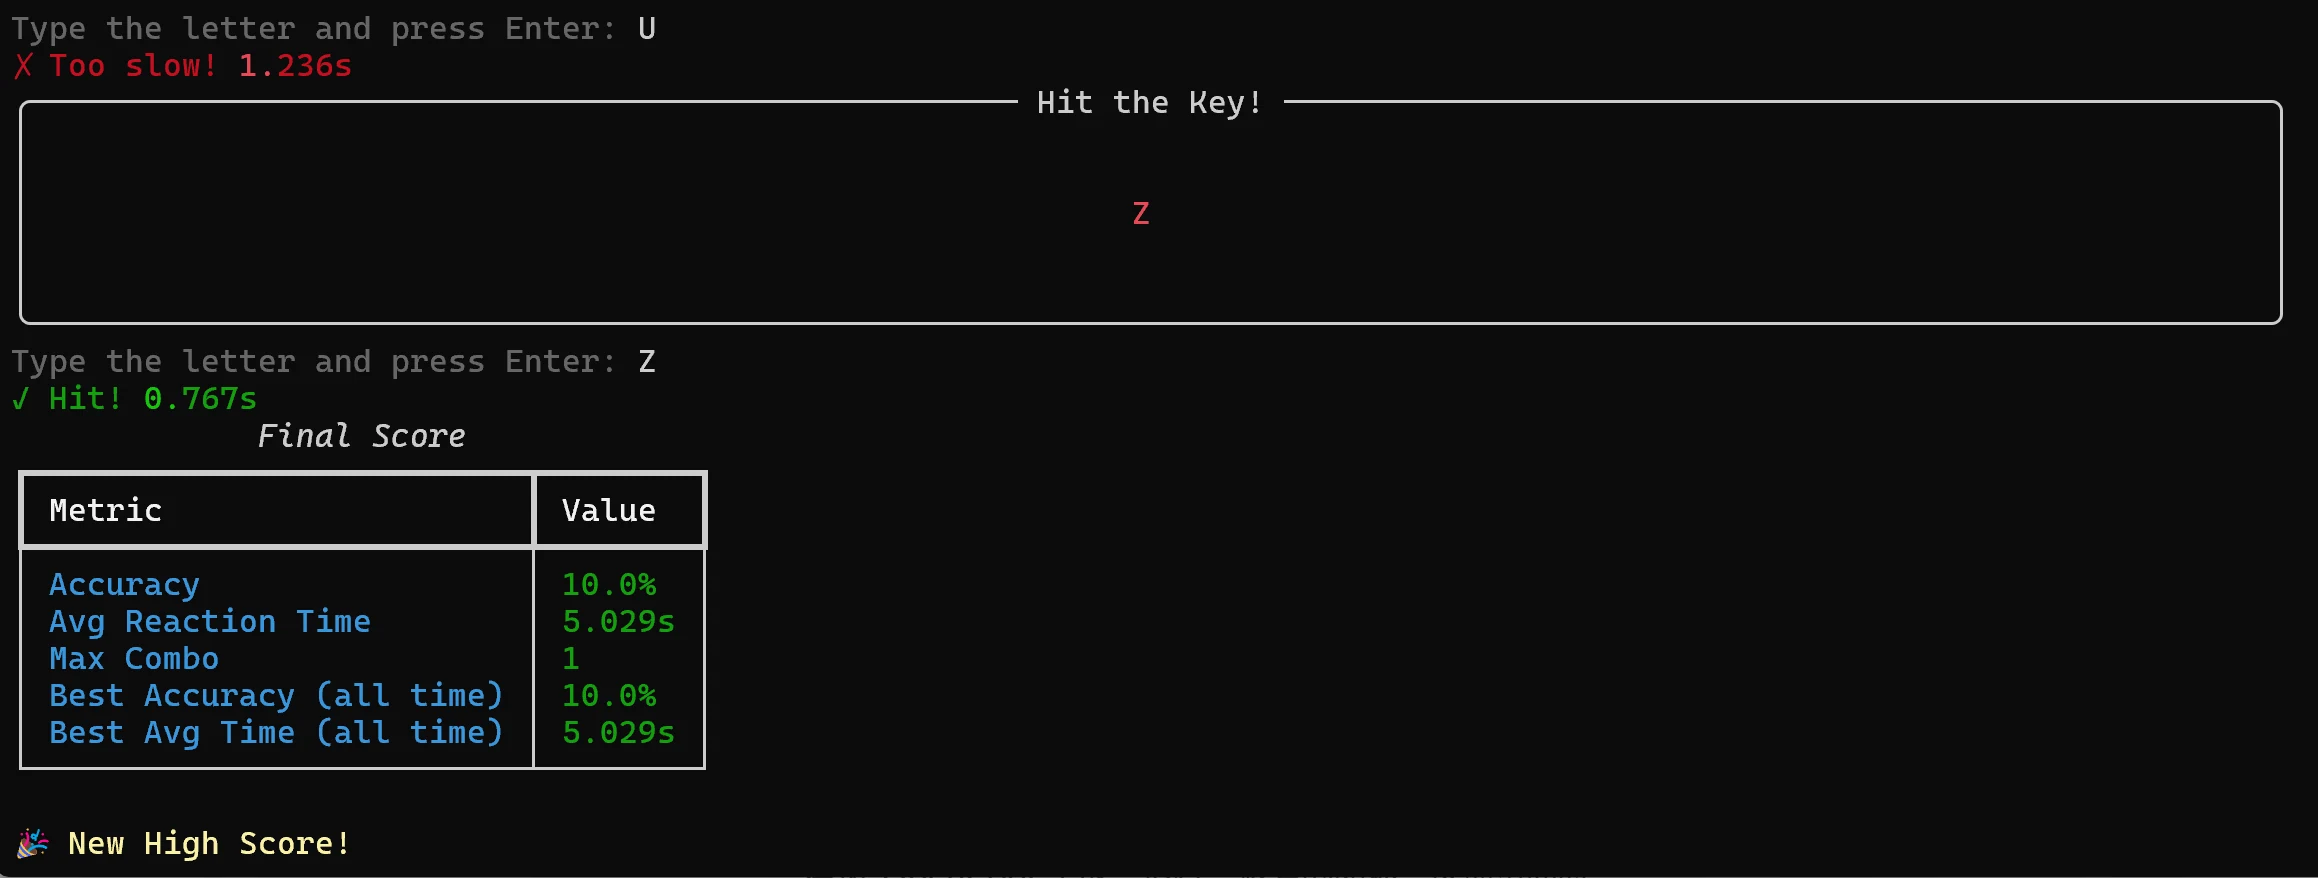
py game.pyPlay through the 10 rounds, then confirm the output includes:
- Instant feedback per round (hit/miss + reaction time)
- A final score table (accuracy, average reaction time, max combo)
- A “new high score” message when applicable
- A
highscore.jsonfile saved/updated in the project directory
What you’ve proven with this demo
With just one short script, you’ve demonstrated the full “agentic loop” OpenCode is built for:
- Build from a spec: a complete mini-game generated from a structured prompt
- Run and verify: the project is executed locally, not just “written”
- Ship a real artifact: results persist via
highscore.json, making the demo repeatable and comparable across runs
This is the kind of tight feedback cycle that makes OpenCode feel like a real engineering partner—especially in live demos where “seeing it work” matters more than reading code.
💡 More things you can do with OpenCode
The “Hit the Key” demo is tiny by design, but the same loop scales to real work: plan → build → run → fix → ship. In practice, OpenCode is most useful for:
- Safe architecture and change planning (Plan): generate a file tree, step-by-step implementation plan, and acceptance criteria before touching the repo.
- Hands-on implementation (Build): create/edit files, run commands, and iterate until tests pass—while keeping changes small and reviewable.
- Guardrailed automation with permissions: configure what the agent can run automatically vs. what must be approved (or blocked), so you can safely delegate repetitive tasks.
- Non-interactive, reproducible runs (CLI): script tasks like “run tests and summarize failures” or attach a TUI to a remote backend session for consistent workflows across machines.
- GitHub-native collaboration: trigger OpenCode from issues/PR comments (e.g., triage, implement fixes/features, and submit a PR from a runner).
- Specialized agents: create custom agents with tailored prompts and tool/permission configs for roles like “review-only,” “docs,” or “debu
OpenCode Beyond the Terminal: Desktop App + IDE Integrations
OpenCode is often used in the terminal, but you can also run it as a Desktop app (Beta) or inside your IDE—and in both cases, you can keep using Novita AI’s OpenAI-compatible API. The interface changes, but the model/provider setup stays the same: point the OpenAI provider and select zai-org/glm-4.7.
Desktop app
OpenCode’s Desktop build is available for macOS, Windows, and Linux. If you prefer a standalone UI for longer agent sessions, the Desktop app is a great fit—and it can use the same provider configuration you already created for Novita AI.
IDE integrations
OpenCode provides official integration flows for:
- VS Code
- Cursor
- Zed
- Windsurf
- VSCodium
Conclusion
OpenCode brings agentic coding into your daily workflow—whether in the terminal, Desktop app, or IDE. With GLM-4.7 connected via Novita AI’s OpenAI-compatible API , you can reliably handle multi-step tasks like planning changes, editing across files, running tests, and iterating until the project ships.
Novita AI is an AI cloud platform that offers developers an easy way to deploy AI models using our simple API, while also providing affordable and reliable GPU cloud for building and scaling.
Frequently Asked Questions
What is OpenCode?
OpenCode is a browser-based code editor that brings AI models directly into your workspace. You can edit code, run scripts, and collaborate with an AI assistant in real time. By configuring a provider such as the NaviGator Toolkit, you can customize OpenCode into your own personal AI coding copilot.
Is OpenCode Safe?
Yes,OpenCode does not store any of your code or context data, so that it can operate in privacy sensitive environments.
Is OpenCode Free?
OpenCode is one of those rare open-source tools that makes you pause. It’s currently topping GitHub with ~72k stars—and after trying it, the momentum makes sense. Think of it as an AI coding agent in the same vein as Claude Code, but fully free and open-source.