في الآونة الأخيرة، شهدنا نموًا أسّيًا في مجال الذكاء الاصطناعي مع نماذج اللغة الكبيرة (LLM) ونماذج اللغة البصرية، وما إلى ذلك، وبشكل أكثر حداثة، وكلاء الذكاء الاصطناعي. على عكس التطبيقات القائمة على القواعد التقليدية، يمكن لهؤلاء الوكلاء استخدام قدراتهم على الاستدلال واتخاذ القرار لأداء مهام معقدة بشكل مستقل أو مع أقل قدر ممكن من تدخل المستخدم. للقيام بذلك، غالبًا ما يحتاج وكلاء الذكاء الاصطناعي إلى إنشاء وتنفيذ التعليمات البرمجية ديناميكيًا، أو حتى التحكم في الجهاز الظاهري بالكامل، وNovita AI sandbox يوفر هذه القدرات.
في هذا البرنامج التعليمي، سنقوم بإنشاء وكيل ذكاء اصطناعي سيعمل كمحلل بيانات خاص بنا، وتمامًا مثل المحلل البشري، سيكون قادرًا على العثور على مجموعة بيانات وتنزيلها باستخدام المتصفح وفقًا لتعليماتنا، وعند الطلب، تحليلها، وتصويرها، وتنفيذ التعليمات البرمجية للرد علينا برؤى مستخلصة.
ما هو وكيل الذكاء الاصطناعي؟
وكيل الذكاء الاصطناعي هو برنامج برمجي يستخدم الذكاء الاصطناعي للاستدلال، ووضع الخطط، وتنفيذ الإجراءات للوصول إلى أهداف محددة. يمكن لهؤلاء الوكلاء استخدام أدوات، مثل واجهات برمجة التطبيقات (APIs)، وتنفيذ التعليمات البرمجية، والبحث على الويب، لجمع المعلومات أو أداء المهام. في بعض الأحيان، يتعاونون أيضًا مع وكلاء آخرين، خاصة للأهداف الأكثر تعقيدًا، مثل البحث العميق.
إليك المكونات النموذجية لوكيل ذكاء اصطناعي:
- الاستدلال / التخطيط: عند تحديد هدف له، ينشئ الوكيل خططًا خطوة بخطوة لتحقيقه. قد تتضمن هذه العملية إكمال المهام الفرعية وجمع معلومات إضافية لتوجيه إجراءاته التالية. هذا شائع بشكل خاص للمهام المعقدة التي تستغرق وقتًا أطول، وتعمل نماذج الاستدلال بشكل جيد في هذه الحالات.
- استخدام الأدوات: يمكن لوكلاء الذكاء الاصطناعي استدعاء أدوات وخدمات خارجية. قد تشمل هذه الوظائف، وواجهات برمجة التطبيقات (APIs)، أو موارد أخرى توسع من قدراتهم.
- التنسيق: يمكن للعديد من الوكلاء العمل معًا من خلال تقسيم المسؤوليات، حيث يساعد كل منهم في تحقيق هدف مشترك، معقد، أو طويل الأمد.
نظرة عامة على Novita AI Sandbox ومنتجات LLM وتصفح المتصفح Browser Use
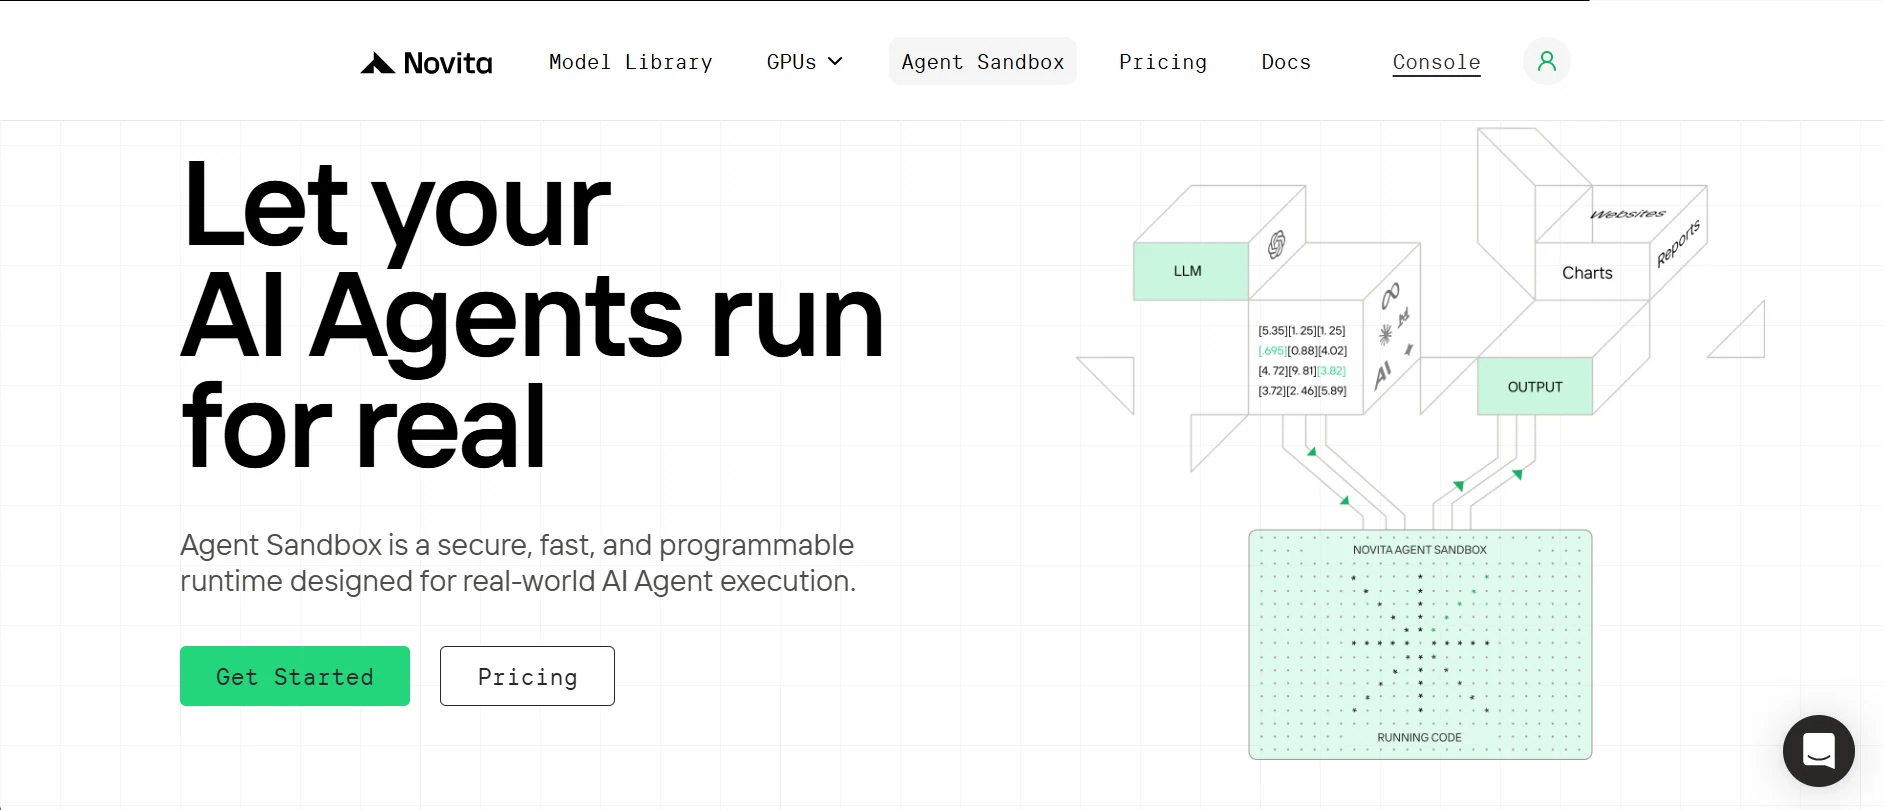
ما هي المساحة التجربية (Sandbox) ولماذا تعد مهمة؟
المساحة التجربية (Sandbox) هي بيئة تشغيل معزولة وآمنة حيث يمكن تنفيذ التعليمات البرمجية غير الموثوقة دون التأثير على نظام المضيف. هي في الأساس جهاز ظاهري خفيف الوزن يمكن لوكيل الذكاء الاصطناعي الخاص بك من تنفيذ التعليمات البرمجية، والأوامر، وإنشاء الملفات، وما إلى ذلك.
توفر Novita AI هذه المساحة التجربة على السحابة ليتمكن وكيلك من الوصول إليها بسرعة عند الطلب، مع فواتير مرنة بالثانية بناءً على الموارد المستخدمة.
الميزات الرئيسية لمساحة Novita التجربية:
- عزلة آمنة: تحصل كل مساحة تجربة على نظام ملفاتها وبيئتها المعزولة، مما يحمي البيانات ويمنع التفاعلات غير المقصودة.
- بدء تشغيل سريع: تطلق مثيلات المساحة التجربة في أقل من 200 مللي ثانية في المتوسط، مما يجعلها مثالية للسيناريوهات منخفضة التأخير.
- دعم لغات متعددة: يمكنك تشغيل التعليمات البرمجية بلغات برمجة متعددة، بما في ذلك Python و JavaScript و TypeScript، والمزيد.
- إيقاف مؤقت واستئناف سريع: يمكنك إيقاف المساحة التجربة مؤقتًا في أي وقت واستئنافها عند الحاجة، مع استعادة كاملة لحالة نظام الملفات والعملية.
- تنفيذ في الخلفية: يدعم تنفيذ المهام في الخلفية وهو مناسب للسيناريوهات التي تتطلب انتظار نتيجة.
واجهة برمجة تطبيقات نماذج Novita:
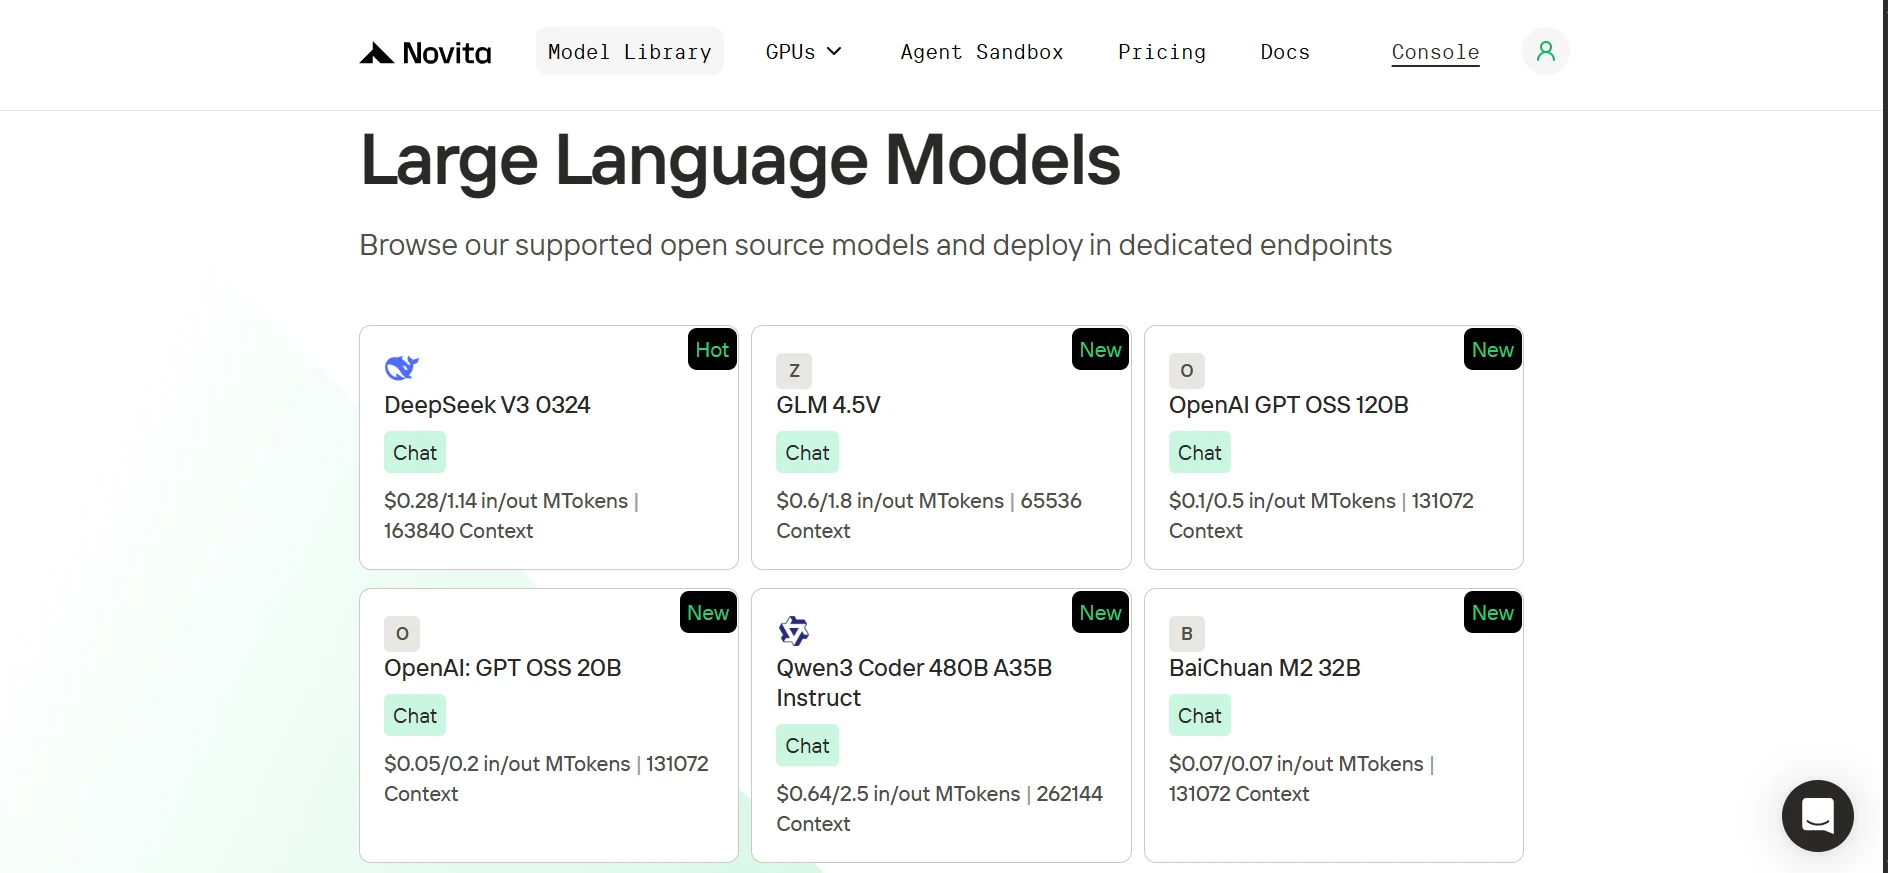
تقدم Novita مكتبة ضخمة من نماذج الذكاء الاصطناعي مفتوحة المصدر من مختبرات أبحاث رائدة مثل OpenAI و Google و DeepSeek و Qwen، إلخ. تشمل هذه النماذج نماذج للغة، والرؤية، والصوت، والفيديو، والتضمين. نماذج اللغة الخاصة بنا متوافقة أيضًا بالكامل مع حزمة تطوير البرامج (SDK) لـ OpenAI، لذا فإن التبديل من OpenAI إلى Novita يتطلب فقط تحديث عنوان URL الأساسي ومفتاح API في العميل الخاص بك، ثم تحديد نموذج Novita.
| from openai import OpenAI client = OpenAI( base_url=“https://api.novita.ai/v3/openai”, api_key=“ ) |
نظرة عامة على تصفح المتصفح Browser Use:
Browser Use هي مكتبة Python مفتوحة المصدر تمكن وكلاء الذكاء الاصطناعي من التفاعل مع متصفحات الويب باستخدام أوامر لغة طبيعية (مثال: “تحقق من الطقس في نيويورك اليوم”). بدلاً من كتابة محددات معقدة قائمة على القواعد، يتعامل الذكاء الاصطناعي مع العثور على العناصر والتفاعل معها. وبما أن واجهة برمجة تطبيقات النماذج الخاصة بـ Novita متوافقة مع OpenAI، يمكنك استخدام أي نموذج LLM أو VLM (نموذج اللغة البصرية) لتشغيل Browser Use.
إعداد بيئة التطوير الخاصة بك
للبدء، سنقوم باستنساخ مستودع GitHub، وإعداد بيئة Python نظيفة، وتثبيت جميع التبعيات المطلوبة، والحصول على مفاتيح Novita AI.
استنسخ مستودع GitHub، وقم بتثبيت التبعيات باستخدام uv.
1. قم بتثبيت uv (مدير حزم Python خفيف الوزن)
| pip install uv |
2. استنسخ المستودع (مستودع GitHub) وانتقل إليه.
| git clone https://github.com/Studio1HQ/AI-sandbox.git cd AI-sandbox |
3. إنشاء وتفعيل البيئة الافتراضية لـ uv
| # Creates a virtual environment uv venv # Activate the virtual environment source .venv/bin/activate # For Mac/Linux # or .venv\Scripts\activate # For Windows |
4. قم بتثبيت تبعيات المشروع
| # Install dependencies uv sync |
إنشاء حساب Novita AI والحصول على مفتاح API
1. سجل حسابك على novita.ai.
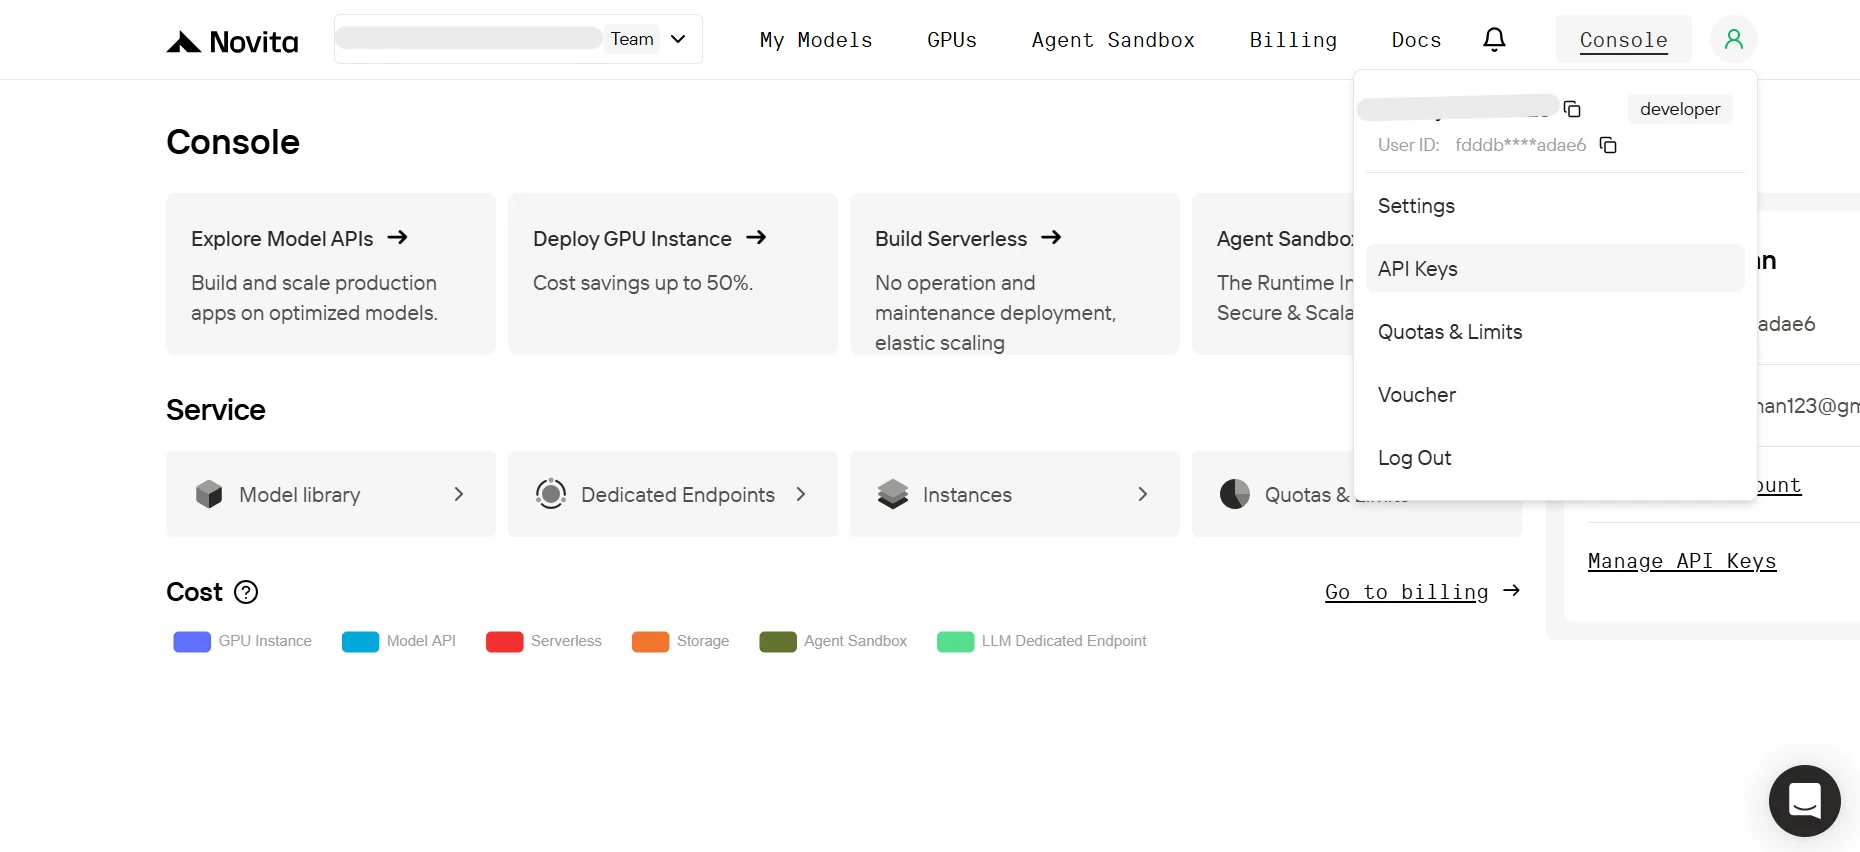
2. في لوحة التحكم، مرر مؤشر الماوس فوق أيقونة ملف تعريف المستخدم وانقر على مفاتيح API في النافذة المنبثقة.
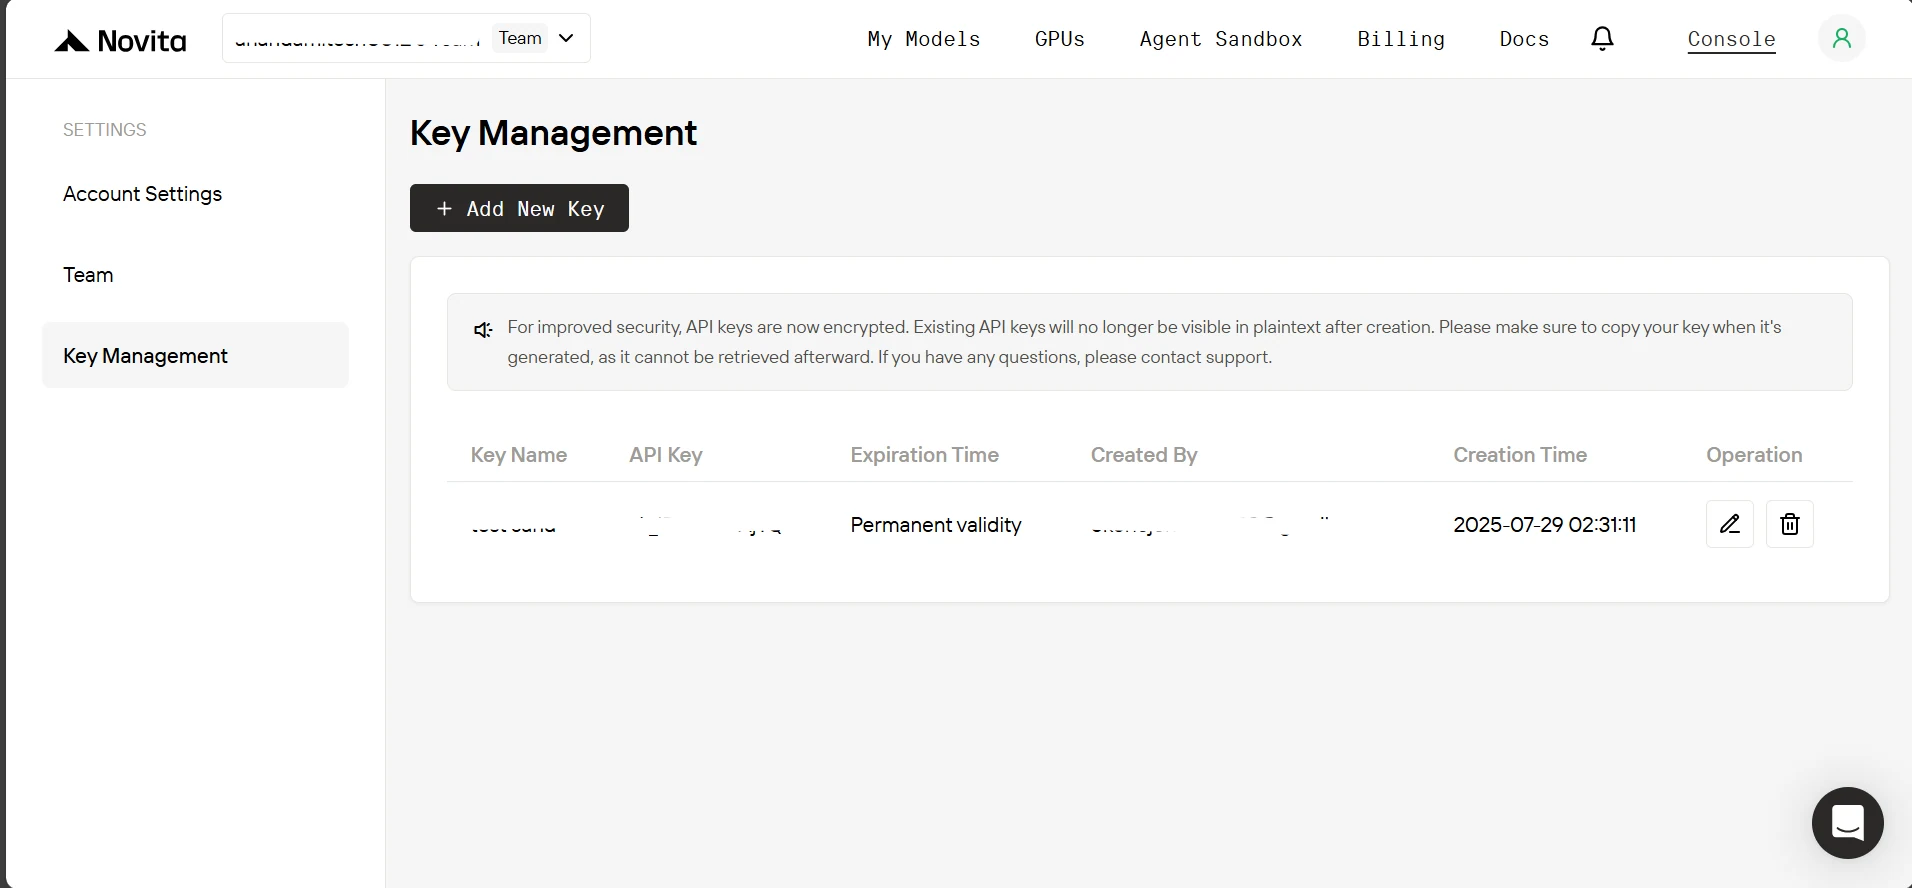
3. في صفحة إدارة المفاتيح، انقر على إضافة مفتاح جديد. في النافذة المنبثقة، أدخل اسمًا لمفتاحك، وانقر على تأكيد، ثم انسخ المفتاح الذي تم إنشاؤه.
4. الآن داخل دليل المشروع، قم بإنشاء ملف .env، والصق ما يلي أدناه.
| NOVITA_API_KEY=“ NOVITA_BASE_URL=“https://api.novita.ai/v3/openai” NOVITA_E2B_DOMAIN=“sandbox.novita.ai” NOVITA_E2B_TEMPLATE=“code-interpreter-v1” |
أضف رصيدًا إلى حساب Novita AI.
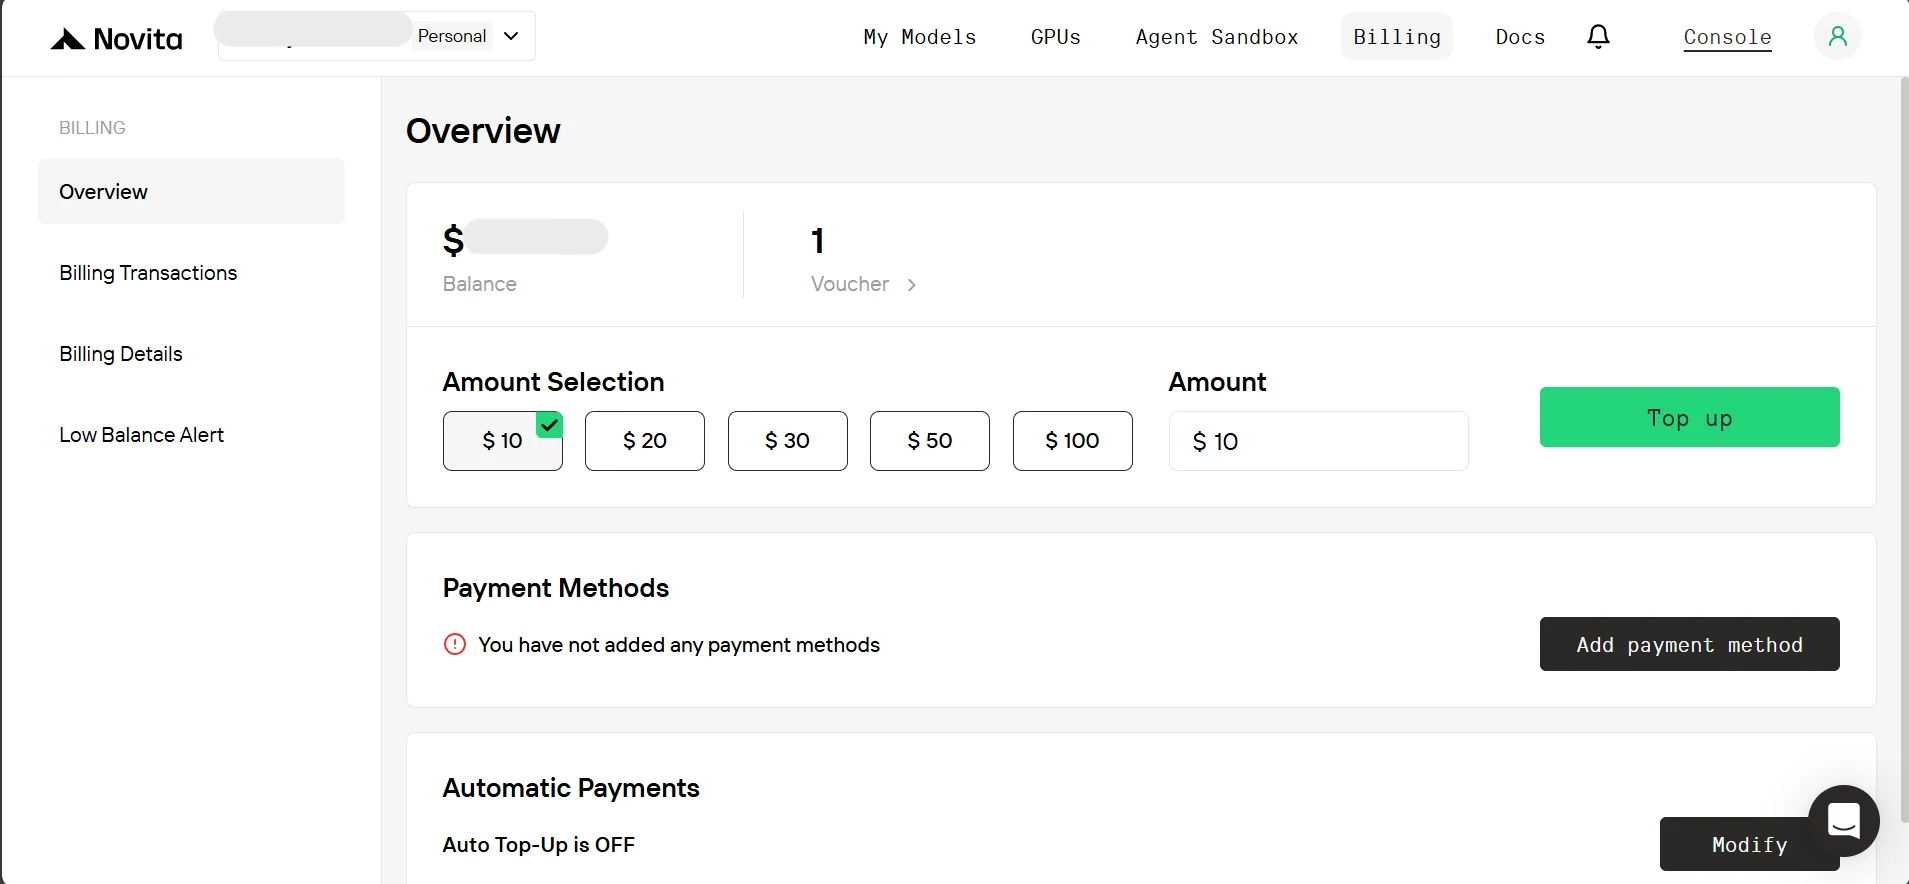
لاستخدام مساحة Novita التجربية، تحتاج إلى إضافة رصيد إلى حسابنا. في علامة تبويب لوحة التحكم، انقر على ‘الفواتير’. ثم، في صفحة الفواتير، أضف طريقة دفع وقم بشحن رصيد لا يقل عن 10 دولارات.
بناء وكيل محلل البيانات الاستكشافي (EDA)
الآن تم إعداد بيئتنا ولدينا مفتاح API الخاص بنا، لنبدأ تشغيل وكيلنا
تنزيل مجموعات البيانات (أو الملفات) عبر استخدام متصفح الوكيل Browser Use:
تمامًا مثل المحلل البشري، نريد أن يكون وكيلنا قادرًا على تلقي التعليمات واستخدام متصفح للحصول على مجموعات البيانات. لذلك، كما هو موضح في browser_agent.py، نقوم أولاً بإنشاء بنية بيانات Pydantic للإخراج النهائي للوكيل، والتي ستأخذ أسماء الملفات المنزلة ونتائج المهام المكتملة لكتابتها في ملف.
| … # below existing code class TaskFile(BaseModel): “”“Represents a file generated as part of a task result e.g. scraped data or researched data.”“” filename: str = Field(…, description=“Name of the file including extension”) content: str = Field(…, description=“Text content to be written into the file”) class AgentOutput(BaseModel): “”“Final aggregated output of the browser agent execution.”“” downloaded_files: Optional[list[str]] = Field( None, description=“List of downloaded file names (with extension), if any” ) task_files: Optional[list[TaskFile]] = Field( None, description=“Files generated from user tasks (e.g., scraped or researched data), if any” ) |
أدناه عينة على كيفية عمل متصفح الوكيل. سنستخدم نموذج لغة كبير (LLM) للتنقل في الويب عبر المتصفح، والذي يجب أن يغطي معظم حالات الاستخدام. ومع ذلك، لمهام واجهة المستخدم الأكثر تعقيدًا (مثال: حل كاباتشا)، يوصى بنموذج اللغة البصرية (VLM). عند استخدام نموذج VLM، يمكنك تعيين مستوى تفاصيل الرؤية (‘مرتفع’، ‘منخفض’، أو ‘تلقائي’) لموازنة تكلفة الرموز مقابل وضوح الرؤية.
ثم نقوم بإنشاء جلسة متصفح، وتهيئة الملف الشخصي مع مسار التنزيل (./Download) و user_data_dir (معين إلى None لوضع التصفح المتخفي)، ونقوم بتعيين نموذج Pydantic الخاص بنا كوحدة تحكم للحصول على مخرجات الوكيل منظمة. بعد ذلك، سنبدأ الوكيل باستخدام await agent.run()، وتتم تحليل النتائج النهائية للحصول على أسماء الملفات المنزلة.
| # A sample of how the browser agent will look agent = Agent( task=“Go to Hugging Face, search for An-j96/SuperstoreData and open its page, then navigate to the Files tab and download the data csv file.”, llm=ChatOpenAI(base_url=novita_base_url, model=novita_model, api_key=novita_api_key), use_vision=False, vision_detail_level=“auto”, # available options [‘low’, ‘high’, ‘auto’]; browser_session=BrowserSession( browser_profile=BrowserProfile( downloads_path=“./Download”, user_data_dir=None ) ), # set the download directory path for the browser. controller=Controller( output_model=AgentOutput ), # Get the agent to output the name of the downloaded file at the end of the task. ) all_results = await agent.run() final_output = AgentOutput.model_validate_json( all_results.final_result() ) # parse the final agent result. |
(ملاحظة: تشغيل وكيل المتصفح على جهازك المحلي سيطلق مثيل متصفح حقيقي حتى تتمكن من مشاهدته أثناء العمل.) ستقوم الطريقة الكاملة بجمع أسماء الملفات المنزلة، وكتابة نتائج المهام في ملف، وإرجاع جميع مسارات الملفات للتحميل لاحقًا.
| … # below existing code async def downloading_task_for_browser_agent( task: str, api_key: str, model: str, model_api_base_url: str, use_vision: bool, download_dir_path: str = “./Download”, ) -> Tuple[str, list[str]]: “”“ Will perform the user’s download task via browser use and return download directory path and the downloaded files names. Returns: Tuple of (download_directory, filenames_with_extension) ”“” agent = Agent( task=task, llm=ChatOpenAI( base_url=model_api_base_url, model=model, api_key=api_key, max_completion_tokens=20_000, frequency_penalty=0, # This penalty can slightly affect tool use; keep at 0. ), use_vision=use_vision, vision_detail_level=“auto”, # available options [‘low’, ‘high’, ‘auto’]; browser_session=BrowserSession( browser_profile=BrowserProfile( downloads_path=download_dir_path, user_data_dir=None, # “./browser_user_data” ) ), # set the download directory path for the browser. controller=Controller( output_model=AgentOutput ), # Have the agent output the task execution result according to the AgentOutput schema. max_failures=5, ) try: # Run the agent and structure its output all_results = await agent.run() final_output: AgentOutput = AgentOutput.model_validate_json( all_results.final_result() ) if final_output.task_files: console.print( Panel( f"[bold yellow]Writing task results to files…[/bold yellow] {final_output.task_files}“, title=“Task Results”, border_style=“white”, ) ) # Write each task result to a file in the download directory task_result_files: list[str] = [] for task_file in final_output.task_files or []: file_path = Path(task_file.filename) # Prevent path traversal or unsafe absolute paths if file_path.is_absolute() or “…” in file_path.parts: raise ValueError( f"The agent passed an unsafe file path as a filename: {file_path}” ) # Point the file path inside the download directory file_path = Path(download_dir_path) / file_path # Ensure the download directory exists, else create it. file_path.parent.mkdir(parents=True, exist_ok=True) # Write task result content to a file with open(file_path, “w”, encoding=“utf-8”) as f: f.write(task_file.content) task_result_files.append(task_file.filename) if task_result_files: console.print( Panel( f"[bold green]Task results written to files:[/bold green] {task_result_files}“, title=“Task Results”, border_style=“white”, ) ) # Combine downloaded files with task result files file_results = (final_output.downloaded_files or []) + task_result_files if file_results: console.print( Panel( f”[bold green]Files available:[/bold green] {file_results} in {download_dir_path}“, title=“Downloaded Files”, border_style=“green”, ) ) else: raise RuntimeError(“No files were downloaded or written.”) except Exception as e: file_results = None console.print( Panel( f”[bold red]Error:[/bold red] {str(e)}\ ", title=“Execution Error”, border_style=“red”, ) ) return (download_dir_path, file_results) |
يتم تغليف استدعاء الوكيل في كتلة try-except، لذا إذا حدث فشل، يتم طرح استثناء، وتعيين file_results إلى None. أخيرًا، ترجع الطريقة كلًا من download_dir_path ومسارات file_results.
تحديد مخططات الأدوات المتاحة لوكيلنا:
الآن بعد أن انتهينا من استخدام المتصفح، حان الوقت لتحديد مخططات الأدوات المتاحة لوكيل EDA الخاص بنا. سنوفر أربع أدوات:
- run_python_code: تمكن الوكيل من تنفيذ تعليمات Python البرمجية داخل المساحة التجربية.
- run_on_command_line: تسمح للوكيل بتشغيل الأوامر في طرفية المساحة التجربة (مثال: تثبيت حزم Python).
- sync_with_user: تمكن الوكيل من مزامنة الملفات والدلائل التي تم إنشاؤها أو تحديثها من المساحة التجربة إلى مجلد المزامنة المحلي الخاص بك.
- delete_from_user_sync_folder: تسمح للوكيل بإزالة الملفات أو الدلائل من مجلد المزامنة المحلي.
معًا، تمنح جميع هذه الأدوات الوكيل تحكمًا كاملاً في تنفيذ التعليمات البرمجية، واستخدام الطرفية، ومزامنة الملفات بين المساحة التجربة ونظامك المحلي.
في ملف sandbox_eda.py، نرى مخطط الأدوات:
- run_python_code، الذي يأخذ ببساطة تعليمات Python البرمجية المراد تنفيذها كمعامل إدخال ويرجع نتيجة إذا وجدت.
| { “type”: “function”, “function”: { “name”: “run_python_code”, “description”: “Runs the python code and returns the result if any.”, “parameters”: { “type”: “object”, “properties”: { “python_code”: { “type”: “string”, “description”: “The Python code to run.”, } }, “required”: [“python_code”], }, }, }, |
- run_on_command_line، الذي يأخذ أيضًا ببساطة الأمر المراد تشغيله كمعامل إدخال ويرجع نتيجة إذا وجدت.
| { “type”: “function”, “function”: { “name”: “run_on_command_line”, “description”: “Runs the command on the command line and returns the result if any.”, “parameters”: { “type”: “object”, “properties”: { “command”: { “type”: “string”, “description”: “The command to run on the command line.”, } }, “required”: [“command”], }, }, }, |
- sync_with_user، الذي يأخذ معاملين إدخال:
- sandbox_path: المسار إلى الملف أو الدليل داخل المساحة التجربة.
- path_on_user_sync_folder: المسار الذي يريد الوكيل أن يأخذه الملف أو الدليل داخل مجلد مزامنة المستخدم.
سيكون هذا المسار الثاني من النموذج (مثال: /new.txt)، مع افتراض أن مجلد المزامنة هو الأصل. على سبيل المثال، سنقوم لاحقًا بحل /new.txt إلى sync_folder/new.txt.
| { “type”: “function”, “function”: { “name”: “sync_with_user”, “description”: “Will sync a file or directory on sandbox, to the sync folder on the user’s computer”, “parameters”: { “type”: “object”, “properties”: { “sandbox_path”: { “type”: “string”, “description”: “Path to the file or directory on the sandbox.”, }, “path_on_user_sync_folder”: { “type”: “string”, “description”: “Relative path where the file or directory will be placed inside the user’s sync folder. For example, ‘/hello.txt’ goes directly in the sync folder, while ‘/run1/hello.txt’ will be placed in a ‘run1’ subfolder within the sync folder.”, }, }, “required”: [“sandbox_path”, “path_on_user_sync_folder”], }, }, }, |
- delete_from_user_sync_folder، الذي يأخذ معامل إدخال واحد فقط:
- path_on_user_sync_folder: المسار إلى الملف أو الدليل الذي يريد الوكيل حذفه من مجلد مزامنة المستخدم.
لاحظ أن هذا يتبع نفس افتراضات المسار كما في sync_with_user.
| { “type”: “function”, “function”: { “name”: “delete_from_user_sync_folder”, “description”: “Will delete a file or directory from the sync folder on the user’s computer”, “parameters”: { “type”: “object”, “properties”: { “path_on_user_sync_folder”: { “type”: “string”, “description”: “Relative path to the file or directory on the user’s sync folder. For example, ‘/hello.txt’ will delete it directly from the sync folder, while ‘/run1/hello.txt’ will delete it directly from ‘run1’ subfolder within the sync folder.”, } }, “required”: [“path_on_user_sync_folder”], }, }, }, |
تنفيذ الوظائف المتاحة:
أولاً، لدينا فئة SandboxEDA تأخذ المعلمات التالية:
- sandbox: مثيل المساحة التجربة.
- model_base_url و model_api_key: للاتصال بنموذج Novita.
- max_consecutive_function_calls_allowed: القيمة الافتراضية هي 30 لمنع حلقات استدعاء الوظائف اللانهائية من الوكيل، كما سنرى لاحقًا.
| … # below existing code class SandboxEDA: def __init__( self, sandbox: Sandbox, model_api_base_url: str, model_api_key: str, max_consecutive_function_calls_allowed: int = 30, ): self.sandbox = sandbox self.model_api_base_url = model_api_base_url self.model_api_key = model_api_key self.max_consecutive_function_calls_allowed = ( max_consecutive_function_calls_allowed ) |
ثم دالة run_python_code كطريقة في فئة SandboxEDA. تأخذ الطريقة تعليمات Python البرمجية كمدخل وتستخدم مثيل sandbox لتنفيذها. عند إرجاع المخرجات، يتم حفظ أي مخرجات صور (ملاحظة: يتم ترميزها بـ base64) في دليل temp_image_output. أخيرًا، ترجع الطريقة قاموسًا يحتوي على مخرجات الصور، والمخرجات الأخرى، والسجلات، وأي أخطاء.
| … # below existing code class SandboxEDA: … # below existing code def run_python_code(self, python_code: str) -> dict: “”“ Runs the python code on the sandbox, and if there are any images save them locally. Args: python_code (str): The python code to run. Returns: dict: Containing the base64 image outputs and other outputs (stdout, logs, error, etc). ”“” execution = self.sandbox.run_code(python_code, language=“python”) image_outputs = [result.png for result in execution.results if result.png] # Iterate through the base64 encoded images and save them to a file with name format: temp-{timestamp}.png to ./temp_image_output dir for b64_image in image_outputs: timestamp = int(time.time_ns()) image_filename = Path(f"./temp_image_output/temp-{timestamp}.png") # Will create the temp_image_output directory if it doesn’t exist already. image_filename.parent.mkdir(parents=True, exist_ok=True) with open(image_filename, “wb”) as f: f.write(base64.b64decode(b64_image)) return { “image_outputs”: image_outputs, “other_outputs”: { “outputs”: [result for result in execution.results if not result.png], “logs”: execution.logs, “error”: execution.error, }, } |
بعد ذلك، طريقة run_on_command_line. تقوم هذه الطريقة بشكل مشابه بتنفيذ الأمر على مثيل المساحة التجربة، ثم ترجع قاموسًا بالمخرجات. إذا فشل التنفيذ، ترجع قاموسًا بقيمة None للمخرجات وتعيين “خطأ في التنفيذ” إلى رسالة الخطأ.
| … # below existing code class SandboxEDA: … # below existing code def run_on_command_line(self, command: str) -> dict: “”“ Runs the command on the sandbox. Args: command (str): The command to run. Returns: dict: Containing the output of the command and the execution error if any. ”“” try: result = self.sandbox.commands.run(command) return { “output”: { “stdout”: result.stdout, “stderr”: result.stderr, “exit_code”: result.exit_code, “error”: result.error, }, “execution error”: None, } except Exception as e: return {“output”: None, “execution error”: str(e)} |
وطريقة sync_with_user. كما تم وصفه سابقًا، تأخذ هذه الطريقة sandbox_path و path_on_user_sync_folder. إذا كان مسار المساحة التجربة يشير إلى ملف، فإنها تنزّل الملف من المساحة التجربة إلى مواقع مجلد المزامنة المقابلة. إذا كان دليلًا، فإن الطريقة تعبر بشكل متكرر عن جميع المحتويات الفرعية وتنزّل كل ملف إلى مواقعه المقابلة. إذا نجحت العملية، نرجع “تمت المزامنة بنجاح” وإلا نرجع رسالة الاستثناء.
| … # below existing code class SandboxEDA: … # below existing code def sync_with_user(self, sandbox_path, path_on_user_sync_folder): “”“ Downloads a file or directory from the sandbox to the user’s sync folder. Args: sandbox_path (str): The path of the file or directory to sync in the sandbox. path_on_user_sync_folder (str): The relative destination path of the file or directory in the user’s sync folder. Returns: str: “Sync Successful” if the file or directory was synced successfully, otherwise an error message. ”“” try: path_info = self.sandbox.files.get_info(sandbox_path) if path_info.type == FileType.DIR: # If its a directory loop through the contents and download them. dir_contents = self.sandbox.files.list(sandbox_path) for content in dir_contents: path_to_content_in_sync_folder = Path( path_on_user_sync_folder ).joinpath(content.name) self.sync_with_user(content.path, path_to_content_in_sync_folder) elif path_info.type == FileType.FILE: # Ensure the file is always inside ./sync_folder. sandbox_path_obj = Path(path_on_user_sync_folder) # Make the path relative by stripping any root or drive component relative_path = sandbox_path_obj.relative_to( sandbox_path_obj.anchor or “.” ) # Final path inside sync_folder file_path = Path(“sync_folder”) / relative_path # Will create any directory in the path that doesn’t exist already. file_path.parent.mkdir(parents=True, exist_ok=True) # Download the file to sync folder. file_content = self.sandbox.files.read(sandbox_path, “bytes”) with open(file_path, “wb”) as f: f.write(file_content) return “Sync Successful” except Exception as e: return str(e) |
أخيرًا، طريقة delete_from_user_sync_folder. أيضًا، كما تم وصفه بالفعل، تأخذ path_on_user_sync_folder. ثم نحذف الملف أو الدليل المقابل إذا كان موجودًا ونرجع “تم الحذف بنجاح” وإلا نرجع رسالة الاستثناء.
| … # below existing code class SandboxEDA: … # below existing code def delete_from_user_sync_folder(self, path_on_user_sync_folder): “”“ Deletes a file or directory from the user sync folder. Args: path_on_user_sync_folder (str): The path of the file or directory to delete in the user sync folder. Returns: str: “Deletion Successful” if the file or directory was deleted successfully, otherwise an error message. ”“” # Ensure the file is always inside ./sync_folder. sandbox_path_obj = Path(path_on_user_sync_folder) # Make the path relative by stripping any root or drive component relative_path = sandbox_path_obj.relative_to(sandbox_path_obj.anchor or “.”) # Final path inside sync_folder delete_path = Path(“sync_folder”) / relative_path try: if not delete_path.exists(): raise Exception( f"File or Directory does not exist at {path_on_user_sync_folder} in sync folder." ) if delete_path.is_file(): delete_path.unlink() elif delete_path.is_dir(): shutil.rmtree(str(delete_path)) return “Deletion Successful” except Exception as e: return str(e) |
وظائف أخرى للمساحة التجربة:
1. طريقة رفع الملفات إلى المساحة التجربة.
| … # below existing code class SandboxEDA: … # below existing code def upload_files_to_sandbox( self, file_paths: list[str], file_names_in_sandbox: list[str] ): “”“ Uploads files to the sandbox. Args: file_paths (list[str]): File paths of the files to upload (eg [”./Download/data.csv", “./Download/data2.csv”]). file_names_in_sandbox (list[str]): The names the files will take in the sandbox (eg [“data.csv”, “data2.csv”]). Note: The files will be uploaded to the sandbox’s /home/user directory (e.g ./home/user/data.csv, ./home/user/data2.csv). “”“ console.print( f”[yellow]Uploading files(s) at {file_paths} to Sandbox[/yellow] (id: {self.sandbox.sandbox_id})“ ) for file_path, file_name_in_sandbox in zip(file_paths, file_names_in_sandbox): with open(file_path, “rb”) as file: self.sandbox.files.write(file_name_in_sandbox, file) console.print( f”[bold cyan]Files(s) {file_paths} uploaded to Sandbox[/bold cyan] (id: {self.sandbox.sandbox_id})" ) |
2. طريقة سرد محتويات الدليل الرئيسي للمساحة التجربة (/home/user).
| … # below existing code class SandboxEDA: … # below existing code def list_files_in_sandbox_main_dir(self) -> list[str]: return [i.name for i in self.sandbox.files.list(“/home/user”)] |
بناء التفاعل مع الوكيل:
الآن سنرى طريقة للتفاعل مع الوكيل. قبل ذلك، لنلق نظرة على تعليمات موجه النظام المعلمى في ملف prompts/system_prompt.py.
| SYSTEM_PROMPT = “”“ You are an Exploratory Data Analysis (EDA) agent and you have access to a sandbox (with internet access) where you can: - Execute python code using the run_python_code function call. - You can basically do anything you can do on a linux machine via the run_on_command_line or run_python_code function call. - You can sync whatever directory (may be preferred for structure eg website) or file you have created, written to or updated to the user’s sync folder on their local machine through the sync_with_user function call. - You can delete any of those directory or file from the user’s sync folder on their local machine through the delete_from_user_sync_folder function call. Your current PWD is ‘/home/user’ and below are the files in it. {list_sandbox_files} Note: - The sandbox already comes pre-installed with the usual data analysis packages but if there’s a package you are not sure exists or your code had an import error due to a missing package, you can check if it’s installed and if not install it. - For image outputs (e.g from data visualization) make sure it is png format. Function Call Guidelines: - Always use run_python_code to perform any task unless you absolutely need to use run_on_command_line (e.g to install packages, etc) - Chain function calls when needed: After receiving results from one function call, immediately make additional calls if more information is required - Gather just the needed information first: Respond to the user only when you have at least enough information from function calls to provide a good answer - Be efficient: Although there is a maximum limit of {max_consecutive_function_calls_allowed} consecutive function calls try to make as less calls as possible to get just enough information. - Don’t just assume the user will read the output of the tool call respond to them with your answer. Be a helpful assistant to the user who is probably trying to perform EDA on dataset files ({downloaded_dataset_names}) at (/home/user/) directory. You can perform the following function calls: {available_function_calls_schema} ”“” |
الآن ننتقل إلى طريقة eda_chat في فئة SandboxEDA. تأخذ هذه الطريقة أسماء الملفات التي تم رفعها إلى المساحة التجربة (سنقوم بالتعامل مع الرفع قبل بدء الدردشة، كما سنرى لاحقًا) واسم نموذج Novita المراد استخدامه.
1. أولاً، نقوم بتعيين عميل OpenAI للإشارة إلى Novita عبر عنوان URL الأساسي، ونقوم بتهيئة المحادثة باستخدام موجه النظام كأول رسالة.
| … # below existing code class SandboxEDA: … # below existing code def eda_chat( self, downloaded_dataset_names: list[str], model_for_eda: str, ): “”“ Interactive EDA session with AI agent capable of code execution and terminal commands Args: downloaded_dataset_names (list[str]): The names of the downloaded datasets. model_for_eda (str, optional): The underlying model to use. ”“” console.print( Panel( “[bold green]EDA Session Started[/bold green]\ Type ‘quit()’ to exit.”, title=“Exploratory Data Analysis”, border_style=“green”, ) ) client = OpenAI( base_url=self.model_api_base_url, api_key=self.model_api_key, ) # Initialize conversation with system prompt messages = [ { “role”: “system”, “content”: SYSTEM_PROMPT.format( downloaded_dataset_names=str(downloaded_dataset_names), list_sandbox_files=str(self.list_files_in_sandbox_main_dir()), available_function_calls_schema=str( AVAILABLE_FUNCTION_CALL_SCHEMAS ), max_consecutive_function_calls_allowed=self.max_consecutive_function_calls_allowed, ), } ] |
2. بعد ذلك، حلقة الدردشة الرئيسية هي حلقة while، حيث نأخذ رسالة المستخدم ونضيفها إلى سجل الرسائل الحالي. وللحيلولة دون استدعاءات أدوات متتالية لانهائية، داخل حلقة while، توجد حلقة for حتى الحد الأقصى، تثير استثناءً عند الوصول إليه. ثم يتم تقديم النموذج مع الرسائل.
| … # below existing code # Main chat loop while True: user_input = Prompt.ask(“\ [bold yellow]>>> User Message[/bold yellow]”) if user_input.lower().strip() == “quit()”: break messages.append({“role”: “user”, “content”: user_input}) # Handle potential consecutive tool calls with a safety limit to avoid infinite loops for i in range(self.max_consecutive_function_calls_allowed + 1): if i == self.max_consecutive_function_calls_allowed: raise Exception( f"Consecutive tool calls from the Agent must not exceed {self.max_consecutive_function_calls_allowed}." ) response = client.chat.completions.create( model=model_for_eda, messages=messages, tools=AVAILABLE_FUNCTION_CALL_SCHEMAS, frequency_penalty=0, ) response_message = response.choices[0].message |
3. بعد ذلك، نتحقق مما إذا كان النموذج قد قرر إجراء استدعاء أداة. إذا كان الأمر كذلك، فإننا ننفذ الأداة باستخدام الوسائط التي يوفرها النموذج، ونطبع المخرجات في الطرفية للمستخدم (أو نعرض صورة إذا كان ذلك مناسبًا)، ثم نرجع المخرجات إلى النموذج، بدءًا باستدعاء أداة run_python_code.
| … # below existing code tool_calls = response_message.tool_calls if tool_calls: messages.append( response_message ) # Add assistant message that triggered tool calls # Execute each requested tool call for tool_call in tool_calls: name = tool_call.function.name args = json.loads(tool_call.function.arguments) if name == “run_python_code”: console.print( Panel( args[“python_code”], title=“Agent Executing Python Code”, border_style=“blue”, ) ) code_result = self.run_python_code(args[“python_code”]) messages.append( { “tool_call_id”: tool_call.id, “role”: “tool”, “name”: name, # If there are any image outputs (e.g data visualization), as it is not yet possible to return images # from a tool call just inform the Agent that the image has been shown to the user. “content”: [ { “type”: “text”, “text”: ( f"THE IMAGES HAS ALREADY BEEN SHOW TO THE USER ON THE TERMINAL AND SAVED TO TEMP FILES eg temp-{{timestamp}}.png on the user’s computer in ./temp_image_output dir, THE OTHER OUTPUTS ARE BELOW\ {code_result[‘other_outputs’]}“ if code_result[“image_outputs”] else f”{code_result[‘other_outputs’]}" ), } ], } ) display_sandbox_code_output(code_result) |
3b. استدعاء أداة run_on_command_line.
| … # below existing code elif name == “run_on_command_line”: console.print( Panel( args[“command”], title=“Agent Executing Command On Terminal”, border_style=“blue”, ) ) command_result = self.run_on_command_line(args[“command”]) messages.append( { “tool_call_id”: tool_call.id, “role”: “tool”, # Indicates this message is from tool use “name”: name, “content”: str(command_result), } ) display_sandbox_command_output(command_result) |
3c. sync_with_user استدعاء أداة.
| … # below existing code elif name == “sync_with_user”: console.print( Panel( f"[bold yellow]Agent Started Syncing {args[‘sandbox_path’]} To User’s Sync Folder ({args[‘path_on_user_sync_folder’]})[/bold yellow]", title=“File Syncing”, border_style=“white”, ) ) sync_result = self.sync_with_user( args[“sandbox_path”], args[“path_on_user_sync_folder”] ) messages.append( { “tool_call_id”: tool_call.id, “role”: “tool”, # Indicates this message is from tool use “name”: name, “content”: sync_result, } ) … # skipped for brevity |
3d. استدعاء أداة delete_from_user_sync_folder وطرح خطأ غير معروف إذا كانت هناك استدعاءات وظائف غير موجودة.
| … # below existing code elif name == “delete_from_user_sync_folder”: console.print( Panel( f"[bold yellow]Agent Deleting File(s) From User’s Sync Folder ({args[‘path_on_user_sync_folder’]})[/bold yellow]", title=“File Syncing”, border_style=“white”, ) ) delete_result = self.delete_from_user_sync_folder( args[“path_on_user_sync_folder”] ) messages.append( { “tool_call_id”: tool_call.id, “role”: “tool”, # Indicates this message is from tool use “name”: name, “content”: delete_result, } ) … # skipped for brevity else: raise ValueError(f"Unknown Function Call: {name} |
4. إذا لم يكن أحدث استجابة للوكيل استدعاء أداة، فاطبع استجابته للمستخدم واخرج من حلقة حد استدعاءات الأدوات المتتالية.
| … # below existing code else: # No tool calls just display assistant response after adding it to the messages. messages.append( {“role”: “assistant”, “content”: response_message.content} ) console.print( f"[bold green]>>> Assistant Response: {response_message.content} [/]" ) break |
تنسيق تدفق الوكيل:
أخيرًا، لدينا ملف main.py الذي يعمل كنقطة دخول لتطبيقنا، يربط كل شيء معًا. بداخله، تقوم طريقة start_eda بإطلاق جلسة مساحة تجربة جديدة. تحدد معلمة sandbox_timeout المدة التي تظل فيها المساحة التجربة نشطة قبل إنهائها تلقائيًا؛ لعرضنا التوضيحي، سنقوم بتعيينها إلى 900 ثانية (≈ 15 دقيقة).
بعد إنشاء المساحة التجربة، نرفع الملفات إليها، ثم نطلق طريقة eda_chat لبدء التفاعل مع الوكيل.
| … # below existing code def start_eda( model_for_eda: str, dataset_paths: list[str], dataset_file_names: list[str], api_key_for_sandbox_and_model: str, model_api_base_url: str, sandbox_domain: str, sandbox_template: str, sandbox_timeout: int, ): with Sandbox( template=sandbox_template, api_key=api_key_for_sandbox_and_model, domain=sandbox_domain, timeout=sandbox_timeout, ) as sandbox: try: sandbox_eda = SandboxEDA( sandbox, model_api_base_url, api_key_for_sandbox_and_model ) console.print( f"[bold cyan]Started Sandbox[/bold cyan] (id: {sandbox.sandbox_id})“ ) sandbox_eda.upload_files_to_sandbox(dataset_paths, dataset_file_names) sandbox_eda.eda_chat(dataset_file_names, model_for_eda) console.print( f”\ \ [bold cyan]------ EDA Session Completed for Sandbox (id: {sandbox.sandbox_id}) ------[/]“ ) finally: console.print( f”[bold cyan]----- Closed Sandbox (id: {sandbox.sandbox_id})-----[/]\ " ) |
أدناه طريقة main وهي نقطة بدء تطبيقنا:
| … # below existing code async def main( api_key_for_sandbox_and_model: str, model_api_base_url: str, model_for_browser_agent: str, enable_vision_for_browser_agent: bool, model_for_eda: str, sandbox_domain: str, sandbox_template: str, sandbox_timeout_seconds: int, ): while True: # Welcome Banner console.print( Panel( “[bold white]Welcome To Agentic Exploratory Data Analysis[/bold white]\ \ “ ”[grey]How would you like to proceed:[/grey]\ “ ”[grey]1.[/grey] Download a dataset first.\ “ ”[grey]2.[/grey] Proceed with already downloaded dataset.\ “ ”[grey]3.[/grey] Exit”, title=“MAIN MENU”, border_style=“green”, width=70, ) ) choice = Prompt.ask( “\ [bold yellow]Enter your choice[/bold yellow]”, choices=[“1”, “2”, “3”] ).strip() if choice == “1”: result = await choice_download_dataset( api_key_for_sandbox_and_model, model_api_base_url, model_for_browser_agent, enable_vision_for_browser_agent, ) if result: download_path, filenames = result DATASET_PATHS = [ str(Path(download_path) / filename) for filename in filenames ] DATASET_FILE_NAMES = filenames else: continue # User returned to main menu elif choice == “2”: result = choice_proceed_with_already_downloaded_datasets() if result: DATASET_PATHS = result DATASET_FILE_NAMES = [os.path.basename(path) for path in result] else: continue # since user click back to main menu. elif choice == “3”: break # Start the EDA session start_eda( model_for_eda, DATASET_PATHS, DATASET_FILE_NAMES, api_key_for_sandbox_and_model, model_api_base_url, sandbox_domain, sandbox_template, sandbox_timeout_seconds, ) |
بما أن ملف main.py سيتم تشغيله كبرنامج نصي، نضيف الكود أدناه، مع تمرير متغيرات البيئة الخاصة بنا، ومهلة المساحة التجربة، ونماذج Novita التي ننوي استخدامها:
| … # below existing code if __name__ == “__main__”: NOVITA_API_KEY = os.getenv(“NOVITA_API_KEY”) NOVITA_BASE_URL = os.getenv(“NOVITA_BASE_URL”) NOVITA_E2B_DOMAIN = os.getenv(“NOVITA_E2B_DOMAIN”) NOVITA_E2B_TEMPLATE = os.getenv(“NOVITA_E2B_TEMPLATE”) NOVITA_MODEL_FOR_BROWSER_AGENT = “qwen/qwen3-coder-480b-a35b-instruct” ENABLE_VISION_FOR_BROWSER_AGENT = ( False # If true make sure the browser agent model has vision capabilities. ) NOVITA_MODEL_FOR_EDA = “qwen/qwen3-coder-480b-a35b-instruct” NOVITA_SANDBOX_TIMEOUT_SECONDS = 900 # 900 seconds (15 minutes), sandbox instance will be killed automatically after. asyncio.run( main( NOVITA_API_KEY, NOVITA_BASE_URL, NOVITA_MODEL_FOR_BROWSER_AGENT, ENABLE_VISION_FOR_BROWSER_AGENT, NOVITA_MODEL_FOR_EDA, NOVITA_E2B_DOMAIN, NOVITA_E2B_TEMPLATE, NOVITA_SANDBOX_TIMEOUT_SECONDS, ) ) |
تشغيل اختبار لوكيل EDA الخاص بنا:
قم بتشغيل الأمر التالي في الطرفية
| uv run main.py |
الخاتمة
تهانينا على بناء وكيل محلل البيانات الاستكشافي الخاص بك. يمكنك الآن أن تطلبه إنشاء مواقع ويب، وعروض PowerPoint، إلخ، باستخدام التحليلات/الرؤى من أي ملفات مجموعات بيانات، وسيتم مزامنة النتائج مباشرة إلى جهازك المحلي.
للتلخيص السريع، في هذا المقال، تعلمت كيفية بناء وكيل يمكنه تلقي التعليمات، ثم استخدام المتصفح للتنقل في الويب وتنزيل الملفات، وتنفيذ التعليمات البرمجية والأوامر في مساحة Novita التجربة، ومزامنة الملفات والدلائل إلى جهازك المحلي.
هذا مجرد قمة جبل الجليد، يمكنك توسيع نطاق وكيلك للاتصال بقواعد البيانات، والتكامل مع أدوات مثل Google Docs عبر MCP، والكثير غير ذلك. توجه إلى Novita لجعل أفكارك حقيقة واقعة!
Novita AI هي منصة سحابية للذكاء الاصطناعي تقدم للمطورين طريقة سهلة لنشر نماذج الذكاء الاصطناعي باستخدام واجهة برمجة التطبيقات (API) البسيطة الخاصة بنا، مع توفير سحابة GPU بأسعار معقولة وموثوقة للبناء والتوسع.