
AI 산업이 대규모 언어 모델(LLM)의 추론 능력을 인식하기 시작함에 따라, 우리는 더 복잡한 작업을 수행할 수 있도록 하여 이들을 더욱 에이전트화(agentic)하기로 결정했습니다. 이러한 대규모 언어 모델의 범주는 에이전트로 알려지게 되었습니다.
이에 단일 에이전트 시스템이 탄생했습니다. 하지만 곧 여러 작업을 단일 에이전트에 할당하는 것이 에이전트 시스템을 구축하는 가장 현명한 방법이 아니라는 것이 분명해졌습니다. 더 나은 접근 방식은 각자 고유의 작업을 수행하며 사용자가 정의한 목표를 달성하기 위해 협력하는 여러 에이전트를 사용하는 것이었습니다.
하지만 또 다른 문제가 발생했습니다. 여러 에이전트를 관리하는 것은 단일 에이전트를 관리하는 것만큼 쉽지 않습니다. 이를 해결하기 위해 여러 멀티에이전트 시스템 프레임워크가 도입되었으며, 그중 가장 유망한 것이 CrewAI입니다.
CrewAI는 개발자가 멀티에이전트 시스템을 구축할 수 있도록 지원합니다. CrewAI를 사용하면 에이전트, 해당 작업, 워크플로우를 관리할 수 있습니다. 이 글에서는 Novita에서 제공하는 수많은 LLM과 함께 CrewAI를 사용하여 실용적이고 지능형 멀티에이전트 시스템을 구축하는 방법을 알아보겠습니다.
멀티에이전트 시스템이란 무엇이며, 왜 필요한가?
대규모 언어 모델(LLM)이 도입된 이후, 이를 더 자율적으로 만들기 위한 여러 접근 방식이 탐구되었습니다. 가장 인기 있는 접근 방식 중 하나는 논문 언어 모델에서의 추론과 행동의 시너지에서 소개된 ReAct 패턴입니다. LangChain과 같은 프레임워크는 LLM에 에이전트 기능을 부여하기 위해 빠르게 ReAct를 구현했습니다.
AutoGPT와 같은 도구는 텍스트 프롬프트만으로 사용자가 원하는 거의 모든 작업을 수행할 수 있는 더 강력한 AI 에이전트를 구축하여 한 단계 더 나아갔습니다. 이러한 단일 에이전트 시스템은 큰 가능성을 보였지만 몇 가지 한계가 있었습니다. 단일 에이전트는 일반적으로 모든 작업을 처리하기 위해 하나의 LLM에 의존하므로 몇 가지 심각한 단점이 발생합니다:
- 제한된 컨텍스트: 단일 에이전트는 하나의 컨텍스트 창을 사용해 모든 작업을 관리해야 합니다. 워크플로우가 진행됨에 따라 에이전트는 결국 컨텍스트 공간이 부족해집니다.
- 복잡성 증가: 단일 에이전트에 더 많은 작업이 할당될수록 추론을 관리하기가 어려워져 에이전트가 환각(hallucination)을 출력하거나 실패할 가능성이 높아집니다.
- 단일 장애점: 하나의 에이전트가 모든 것을 책임지기 때문에 백업이 없습니다. 에이전트가 작업을 처리할 수 없는 경우 시스템 전체가 실패합니다.
- 병렬화 부족: 작업이 순차적으로 처리됩니다. 속도를 높이기 위해 에이전트가 병렬로 작업할 수 있는 기본 지원 기능이 없습니다.
멀티에이전트 시스템은 이러한 문제를 해결하기 위해 도입되었습니다. 여러 작업을 처리하기 위해 단일 에이전트에 의존하는 대신, 멀티에이전트 시스템은 협력하는 여러 에이전트에 책임을 분산시킵니다. 각 에이전트는 워크플로우의 자신의 부분만 관리하면 되므로 컨텍스트 길이 초과와 같은 문제를 피할 수 있고 전체 컨텍스트 부하가 줄어듭니다.
멀티에이전트 구성은 또한 다양한 목적에 맞춰 다른 모델을 사용할 수 있게 해줍니다: 일부는 특정 작업에 맞춰 미세 조정될 수 있고, 일부는 미리 정의된 프롬프트와 함께 사용할 수 있으며, 일부는 특화된 도구를 갖추고 있고, 다른 일부는 추론에 최적화될 수 있습니다. 이러한 다양성은 성능을 개선할 뿐만 아니라 병렬화를 가능하게 하여, 멀티에이전트 시스템을 단일 에이전트 시스템보다 더 빠르고 효율적으로 만듭니다.
멀티에이전트 시스템을 구축하려면 LLM을 공급하는 모델 제공자와 전체 에이전트 워크플로우를 관리하는 멀티에이전트 프레임워크라는 두 가지 핵심 구성 요소가 필요합니다. 이 글에서는 모델 제공자로 Novita를, 프레임워크로 CrewAI를 사용할 것입니다.
CrewAI 같은 프레임워크가 필요한 이유
멀티에이전트 시스템을 구축하는 것은 단일 에이전트 시스템을 구축하는 것보다 훨씬 복잡합니다. 예를 들어 함수 호출(function calling)을 사용해 도구를 제공하면 Novita의 모든 모델을 쉽게 에이전트로 만들 수 있습니다. 하지만 여러 에이전트를 연결하기 시작하면 복잡성이 크게 증가합니다. 이제 다음과 같은 여러 움직이는 부분을 관리해야 합니다:
- 통신 및 작업 위임: 에이전트 간의 통신 방식과 작업이 에이전트 간에 전달되는 방식을 조정해야 합니다.
- 도구 관리: 프레임워크 없이는 도구 정의와 JSON 스키마를 수동으로 관리해야 하며, 이는 금방 복잡해질 수 있습니다.
- 에이전트 아키텍처 및 패턴: 멀티에이전트 프레임워크는 일반적으로 잘 정립된 에이전트 패턴에 대한 기본 지원 기능을 제공합니다. 처음부터 구축하는 경우 이러한 진화하는 패턴을 최신으로 유지하고 직접 구현해야 합니다.
- 관찰 가능성(Observability): 프레임워크 없이는 에이전트의 상호 작용과 성능을 모니터링, 디버깅, 시각화하기 위한 자체 도구를 설정해야 합니다.
멀티에이전트 프레임워크는 이러한 모든 복잡성을 관리하는 데 도움이 될 수 있습니다. 이 글에서는 프레임워크로 CrewAI를 사용할 것입니다. CrewAI는 다른 프레임워크에 비해 몇 가지 장점이 있습니다: 직관적인 개념을 사용해 멀티에이전트 시스템을 모델링하는 단순함이 돋보이며, 성숙하고 잘 정립되어 있고, 훌륭한 개발자 경험을 제공합니다.
CrewAI의 핵심 개념 이해하기
CrewAI로 멀티에이전트 시스템을 구축하려면 프레임워크에서 도입된 몇 가지 핵심 개념을 숙지해야 합니다. 이 글에서 다룰 주요 개념에 대한 간단한 개요는 다음과 같습니다:
- 에이전트(Agents)
- 작업(Tasks)
- 크루(Crews)
- 프로세스(Processes)
- 플로우(Flows)
에이전트(Agents)
에이전트는 CrewAI의 핵심입니다. 에이전트는 LLM으로 구동되는 실제 AI 작업자를 나타냅니다. CrewAI의 각 에이전트는 역할(role), 의사 결정을 안내하는 목표(goal), 성격을 형성하는 배경 이야기(backstory)로 정의됩니다. 이 모든 것은 LLM에 전송되는 텍스트 프롬프트로 표현됩니다. 에이전트는 특정 작업을 수행하기 위해 선택할 수 있는 도구를 장착할 수도 있습니다. CrewAI에서 에이전트의 주요 목표는 할당된 작업을 완료하는 것입니다.
작업(Tasks)
작업은 완료해야 할 업무를 정의합니다. CrewAI에서 작업을 생성하여 특정 에이전트에 직접 할당하거나, 작업 요구 사항과 일치하는 에이전트가 작업을 가져가도록 할 수 있습니다. 각 작업은 일반적으로 명확한 설명, 예상 출력, 작업을 처리할 수 있는 선택적 에이전트와 같은 기타 관련 매개변수를 포함합니다.
크루(Crew)
이것은 CrewAI의 핵심 개념입니다. CrewAI에서 작업을 달성하기 위해 함께 협력하는 에이전트 그룹을 크루라고 합니다. 크루는 또한 그 내부 에이전트의 워크플로우를 정의합니다.
프로세스(Processes)
프로세스는 크루가 작업을 실행하는 방법을 알려주는 사전 정의된 워크플로우입니다. CrewAI는 두 가지 주요 유형의 프로세스를 지원합니다:
- 순차적(Sequential): 크루의 에이전트가 작업을 한 번에 하나씩 처리합니다.
- 계층적(Hierarchical): 이 프로세스에서 하나의 에이전트가 관리자 역할을 하며, 다른 에이전트를 조정하고 필요에 따라 작업을 위임합니다.
플로우(Flows)
프로세스가 사전 정의된 워크플로우인 반면, CrewAI 플로우는 개발자가 사용자 정의 에이전트 워크플로우를 설계할 수 있는 유연성을 제공합니다. 플로우는 에이전트, 작업, 심지어 전체 크루를 포함할 수 있어 더 복잡한 상호 작용이 가능합니다.
Novita로 크루 구축하기
이제 CrewAI의 핵심 개념을 살펴보았으니, 크루를 구축하는 과정을 알아보겠습니다. 이 예제에서는 사용자가 최소 기능 제품(MVP)을 빠르게 구축할 수 있도록 설계된 크루를 생성할 것입니다. 이 크루는 세 가지 특화된 에이전트로 구성됩니다:
- 아키텍트(Architect): 소프트웨어 구조를 정의하고 MVP 범위를 개요합니다. 이 에이전트는 Novita에서 호스팅되는 moonshotai/kimi-k2-instruct 모델로 구동됩니다.
- 코더(Coder): 아키텍트의 계획을 구현하고 실제 코드를 작성합니다. FileWriter 도구를 사용해 모든 프로젝트 파일을 생성하며, Novita의 qwen/qwen3-coder-480b-a35b-instruct 모델로 구동됩니다.
- 리뷰어(Reviewer): 코더가 생성한 코드를 분석하고 diff 형식의 피드백을 사용해 개선 사항을 제안합니다. 아키텍트와 마찬가지로 moonshotai/kimi-k2-instruct 모델을 사용합니다.
우리 크루는 순차적 프로세스를 따를 것입니다.
설치 및 설정
계획이 준비되었으니, 환경 설정부터 시작하겠습니다. 내장 도구 지원 기능과 함께 CrewAI를 설치하는 것으로 시작합니다:
pip install 'crewai[tools]'
다음으로 Novita API 키가 필요합니다. API 키를 확보했다면 환경 변수에 NOVITA_API_KEY로 추가하세요:
export NOVITA_API_KEY=your_api_key_here
이제 크루 구축을 시작할 준비가 되었습니다.
LLM 생성하기
필요한 종속성을 가져오는 것으로 시작하겠습니다:
import os
from crewai import Agent, Task, Crew, Process, LLM
from crewai_tools import FileWriterTool
다음으로 디스크에 파일을 쓰기 위해 코더 에이전트가 사용할 FileWriterTool 인스턴스를 생성합니다:
file_writer_tool = FileWriterTool()
도구가 준비되었으니, 이제 각 에이전트에 사용할 LLM을 초기화하겠습니다:
architect_llm = LLM(
   model="novita/moonshotai/kimi-k2-instruct",
   temperature=0.5,
   api_base="https://api.novita.ai/v3/openai",
   api_key=os.environ['NOVITA_API_KEY']
)

coder_llm = LLM(
   model="novita/qwen/qwen3-coder-480b-a35b-instruct",
   temperature=0.4,
   api_base="https://api.novita.ai/v3/openai",
   api_key=os.environ['NOVITA_API_KEY']
)

reviewer_llm = LLM(
   model="novita/moonshotai/kimi-k2-instruct",
   temperature=0.5,
   api_base="https://api.novita.ai/v3/openai",
   api_key=os.environ['NOVITA_API_KEY']
)
이 세 가지 LLM 인스턴스는 계획에서 설명한 모델에 해당합니다. 이 모델들은 Novita에서 호스팅되며 CrewAI를 통해 액세스합니다. 내부적으로 CrewAI는 LiteLLM을 사용해 이 모델들과 연결하고 관리합니다.
에이전트 정의하기
이제 세 가지 에이전트를 생성하겠습니다:
architect = Agent(
   role="Software Architect for MVP Projects",
   goal="Define a basic system structure and simple feature set to guide MVP development",
   backstory="""You specialize in quickly outlining software architectures and project scopes for
minimum viable products. Your plans help guide coders with enough structure to get started while staying lean.""",
   llm=architect_llm,
   verbose=True
)

coder = Agent(
   role="Developer for MVP Projects",
   goal="Implement the MVP using simple, clear code, and write all necessary code files using the FileWriter tool",
   backstory="""You're a practical developer focused on speed. You prioritize working code over polish.
Simulate any runtime behavior if needed, and make sure to keep code clear and modular.""",
   llm=coder_llm,
   verbose=True,
   tools=[file_writer_tool]
)

reviewer = Agent(
   role="Code Reviewer for MVP Projects",
   goal="Read the code files, provide helpful feedback, and write improvements as diffs into a markdown file",
   backstory="""You're a fast but thoughtful reviewer. You check code for clarity, obvious bugs, and
provide improvements as diffs. Instead of modifying code directly, you
save your suggestions in a markdown file
for easy inspection.""",
   llm=reviewer_llm,
   verbose=True,
   tools=[file_writer_tool]
)
각 에이전트에는 특정 역할, 목표, 배경 이야기가 할당됩니다.
작업 정의하기
에이전트의 작업을 생성하겠습니다:
architect_task = Task(
   description="""
Create a basic plan for building a simple MVP version of a {project}.
Focus on the core features, basic file structure, and tech stack.
Make the structure minimal but enough to get a working demo.
""",
   expected_output="""
A simple architectural overview with:
- Project goals
- Key components or files
- Basic data flow or structure
""",
   agent=architect,
   output_file="architecture.md"
)

coder_task = Task(
   description="""
Based on the architect's plan, implement the core parts of the {project} MVP.
Keep it lean and functional. Use the FileWriter tool to save all your code files.
If you need to simulate behavior (e.g. without a real interpreter), do so with clear comments or mocked logic.
""",
   expected_output="""
Working code files saved using the FileWriter tool that implement the key features defined in the plan.
Code should be readable and logically structured.
""",
   agent=coder,
   context=[architect_task]
)

review_task = Task(
   description="""
Review the code files created for the {project} MVP. Read each file using the FileRead tool.
Suggest improvements using diffs. Do not modify the original code files directly.
Instead, save all your suggested diffs into a markdown file using the FileWriter tool.
""",
   expected_output="""
A markdown file containing diff-style suggestions for each file reviewed.
""",
   agent=reviewer,
   context=[coder_task],
   output_file="code_review_diffs.md"
)
크루 생성하기
에이전트와 해당 LLM, 작업을 모두 정의했으니, 이제 크루를 조립해 모든 것을 통합하겠습니다:
code_crew = Crew(
   agents=[architect, coder, reviewer],
   tasks=[architect_task, coder_task, review_task],
   process=Process.sequential,
   verbose=True
)
모든 설정이 완료되었으니, 이제 크루를 실행할 수 있습니다:
if __name__ == "__main__":
   code_crew.kickoff(inputs={"project": "Todo App"})
이제 사용자가 정의한 사양을 기반으로 MVP 프로젝트를 생성할 수 있는 완전히 작동하는 크루가 준비되었습니다. 위 예제에서는 크루에 간단한 할 일 앱을 구축하도록 요청했습니다.
작동 방식은 다음과 같습니다:
- 아키텍트 에이전트가 소프트웨어 아키텍처를 설계하고 계획을
architecture.md파일에 저장하는 것으로 시작합니다. - 그 다음 코더 에이전트가 아키텍트의 출력을 가져와 할 일 앱을 구현하기 위해 필요한 디렉토리와 코드 파일을 생성합니다.
- 마지막으로 리뷰어 에이전트가 생성된 코드를 검토하고 diff를 사용해 개선 제안을 제공하며, 피드백을
code_review_diffs.md파일에 저장합니다.
이 크루 기반 개발 워크플로우는 강력하고 모듈식이지만 몇 가지 한계가 있습니다:
- 하드코딩된 프롬프트: 프롬프트를 코드에 직접 삽입하면 시간이 지남에 따라 유지 관리하거나 개선하기가 어려워집니다.
- 분산된 구조: 에이전트와 작업이 인라인으로 정의되어 프로젝트가 커질수록 스크립트가 복잡해지고 탐색하기 어려워질 수 있습니다.
다음 섹션에서는 에이전트 정의와 작업 프롬프트를 YAML 파일로 외부화하여 이를 정리하는 방법을 알아보겠습니다.
클래스 기반 크루 구축하기
CrewAI는 클래스 기반 크루를 생성할 수 있게 해줍니다. 이 구조를 따르도록 이전 코드를 업데이트해 보겠습니다. 먼저 config라는 폴더를 생성합니다. 이 폴더에는 에이전트와 작업의 구성을 정의하는 YAML 파일이 포함됩니다.
에이전트 구성 파일로 사용할 agents.yaml 파일을 생성하겠습니다:
architect:
 role: >
   Software Architect for MVP Projects
 goal: >
   Define a basic system structure and simple feature set to guide MVP development
 backstory: >
   You specialize in quickly outlining software architectures and project scopes for minimum viable products.
  Your plans help guide coders with enough structure to get started while staying lean.

coder:
 role: >
   Developer for MVP Projects
 goal: >
   Implement the MVP using simple, clear code, and write all necessary code files using the FileWriter tool
 backstory: >
   You're a practical developer focused on speed. You prioritize working code over polish.
  Simulate any runtime behavior if needed, and make sure to keep code clear and modular.

reviewer:
 role: >
   Code Reviewer for MVP Projects
 goal: >
   Read the code files, provide helpful feedback, and write improvements as diffs into a markdown file
 backstory: >
   You're a fast but thoughtful reviewer. You check code for clarity, obvious bugs, and provide improvements
  as diffs. Instead of modifying code directly, you save your suggestions in a markdown file for easy inspection.
이 파일은 각 에이전트의 역할, 목표, 배경 이야기를 정의합니다.
다음으로 작업 구성을 저장할 tasks.yaml 파일을 생성하겠습니다:
대신 FileWriter 도구를 사용해 제안한 모든 diff를 마크다운 파일에 저장하세요.
architect_task:
 description: >
   Create a basic plan for building a simple MVP version of a {project}.
  Focus on the core features, basic file structure, and tech stack.
  Make the structure minimal but enough to get a working demo.
 expected_output: >
   A simple architectural overview with:
  - Project goals
  - Key components or files
  - Basic data flow or structure
 agent: architect
 output_file: architecture.md

coder_task:
 description: >
   Based on the architect's plan, implement the core parts of the {project} MVP.
  Keep it lean and functional. Use the FileWriter tool to save all your code files.
  If you need to simulate behavior (e.g. without a real interpreter), do so with clear comments or mocked logic.
 expected_output: >
   Working code files saved using the FileWriter tool that implement the key features defined in the plan.
  Code should be readable and logically structured.
 agent: coder
 context:
   - architect_task

review_task:
 description: >
   Review the code files created for the {project} MVP. Read each file using the FileRead tool.
  Suggest improvements using diffs. Do not modify the original code files directly.
  Instead, save all your suggested diffs into a markdown file using the FileWriter tool.
 expected_output: >
   A markdown file containing diff-style suggestions for each file reviewed.
 agent: reviewer
 context:
   - coder_task
 output_file: code_review_diffs.md
다음으로 클래스 기반 크루를 생성하겠습니다. 이를 위해 클래스를 정의하고 CrewAI에서 제공하는 @CrewBase 데코레이터로 장식합니다:
@CrewBase
class CodeCrew():
   """Three-agent code crew: architect, coder, reviewer"""

   @agent
   def architect(self) -> Agent:
       pass

   @agent
   def coder(self) -> Agent:
       pass

   @agent
   def reviewer(self) -> Agent:
       pass

   @task
   def architect_task(self) -> Task:
       pass

   @task
   def code_task(self) -> Task:
       pass

   @task
   def review_task(self) -> Task:
       pass

   @crew
   def crew(self) -> Crew:
       pass
이 구조에서:
@agent데코레이터는 에이전트를 생성하는 메서드를 정의하는 데 사용됩니다.@task데코레이터는 작업을 생성하는 메서드를 표시합니다.@crew데코레이터는 전체 크루를 조립하는 메서드를 지정합니다.
이제 전체 구현을 살펴보겠습니다:
import os
from crewai import Agent, Crew, Process, Task, LLM
from crewai.project import CrewBase, agent, crew, task
from crewai.agents.agent_builder.base_agent import BaseAgent
from typing import List

from crewai_tools import FileWriterTool

# Instantiate tool
file_writer_tool = FileWriterTool()

@CrewBase
class CodeCrew():

   agents: List[BaseAgent]
   tasks: List[Task]

   agents_config = 'config/agents.yaml'
   tasks_config = 'config/tasks.yaml'

   @agent
   def architect(self) -> Agent:
       llm = LLM(
           model="novita/moonshotai/kimi-k2-instruct",
           temperature=0.5,
           api_base="https://api.novita.ai/v3/openai",
           api_key=os.environ['NOVITA_API_KEY']
       )
       return Agent(
           config=self.agents_config['architect'],
           llm=llm,
           verbose=True
       )

   @agent
   def coder(self) -> Agent:
       llm = LLM(
           model="novita/qwen/qwen3-coder-480b-a35b-instruct",
           temperature=0.4,
           api_base="https://api.novita.ai/v3/openai",
           api_key=os.environ['NOVITA_API_KEY']
       )
       return Agent(
           config=self.agents_config['coder'],
           llm=llm,
           verbose=True,
           tools=[file_writer_tool]
       )

   @agent
   def reviewer(self) -> Agent:
       llm = LLM(
           model="novita/moonshotai/kimi-k2-instruct",
           temperature=0.5,
           api_base="https://api.novita.ai/v3/openai",
           api_key=os.environ['NOVITA_API_KEY']
       )
       return Agent(
           config=self.agents_config['reviewer'],
           llm=llm,
           verbose=True,
       )

   @task
   def architect_task(self) -> Task:
       return Task(config=self.tasks_config['architect_task'])

   @task
   def coder_task(self) -> Task:
       return Task(config=self.tasks_config['coder_task'])

   @task
   def review_task(self) -> Task:
       return Task(config=self.tasks_config['review_task'])

   @crew
   def crew(self) -> Crew:
       return Crew(
           agents=self.agents,
           tasks=self.tasks,
           process=Process.sequential,
           verbose=True
       )
이 코드는 모든 필요한 메서드를 정의하고 에이전트와 작업에 대한 속성을 포함합니다. 또한 구성 파일의 경로를 지정하며, 해당 경로는 에이전트와 작업 메서드 내에서 각각의 설정을 로드하는 데 사용됩니다.
이제 스크립트에 다음 코드를 추가해 크루를 실행할 수 있습니다:
def main():
   code_crew = CodeCrew()
   code_crew.crew().kickoff(inputs={"project": "Todo App"})
if __name__ == '__main__':
   main()
Novita로 플로우 구축하기
앞서 순차적 프로세스를 따르는 크루를 구축했습니다. 이제 사용자 정의 워크플로우를 따르는 플로우를 구축하는 방법을 알아보겠습니다.
우리의 워크플로우
고객 문의를 분류하는 리드 에이전트가 있는 고객 지원 멀티에이전트 시스템을 설계하려고 합니다. 분류를 기반으로 시스템이 문의를 처리하기에 가장 적합한 특화 에이전트를 결정합니다. 구성은 네 가지 에이전트로 이루어집니다:
- 고객 에이전트(Customer Agent): 리드 에이전트로, 고객의 문의를 받아 청구(Billing), 기술(Technical), 일반(General) 중 하나의 카테고리로 분류합니다.
- 청구 에이전트(Billing Agent): 모든 청구 관련 문의를 처리합니다.
- 기술 에이전트(Technical Agent): 기술 관련 문제를 처리합니다.
- 일반 에이전트(General Agent): 위 카테고리에 속하지 않는 모든 문의를 처리합니다.
플로우의 상태 정의하기
CrewAI의 플로우는 공유 상태를 가집니다. 이 상태는 플로우 내의 모든 에이전트와 크루에서 액세스할 수 있습니다. 고객 지원 플로우의 경우 상태에는 문의 레이블과 사용자의 쿼리가 포함됩니다.
필요한 모듈을 가져오고 상태를 정의하겠습니다:
import json
import os
from typing import Literal, Dict, Any
from pydantic import BaseModel, ValidationError
from crewai import Agent, LLM
from crewai.flow.flow import Flow, start, router, listen

# Define the flow state
class SupportState(BaseModel):
   issue: Literal["billing", "technical", "general"] = "general"
   message: str = ""
플로우 생성하기
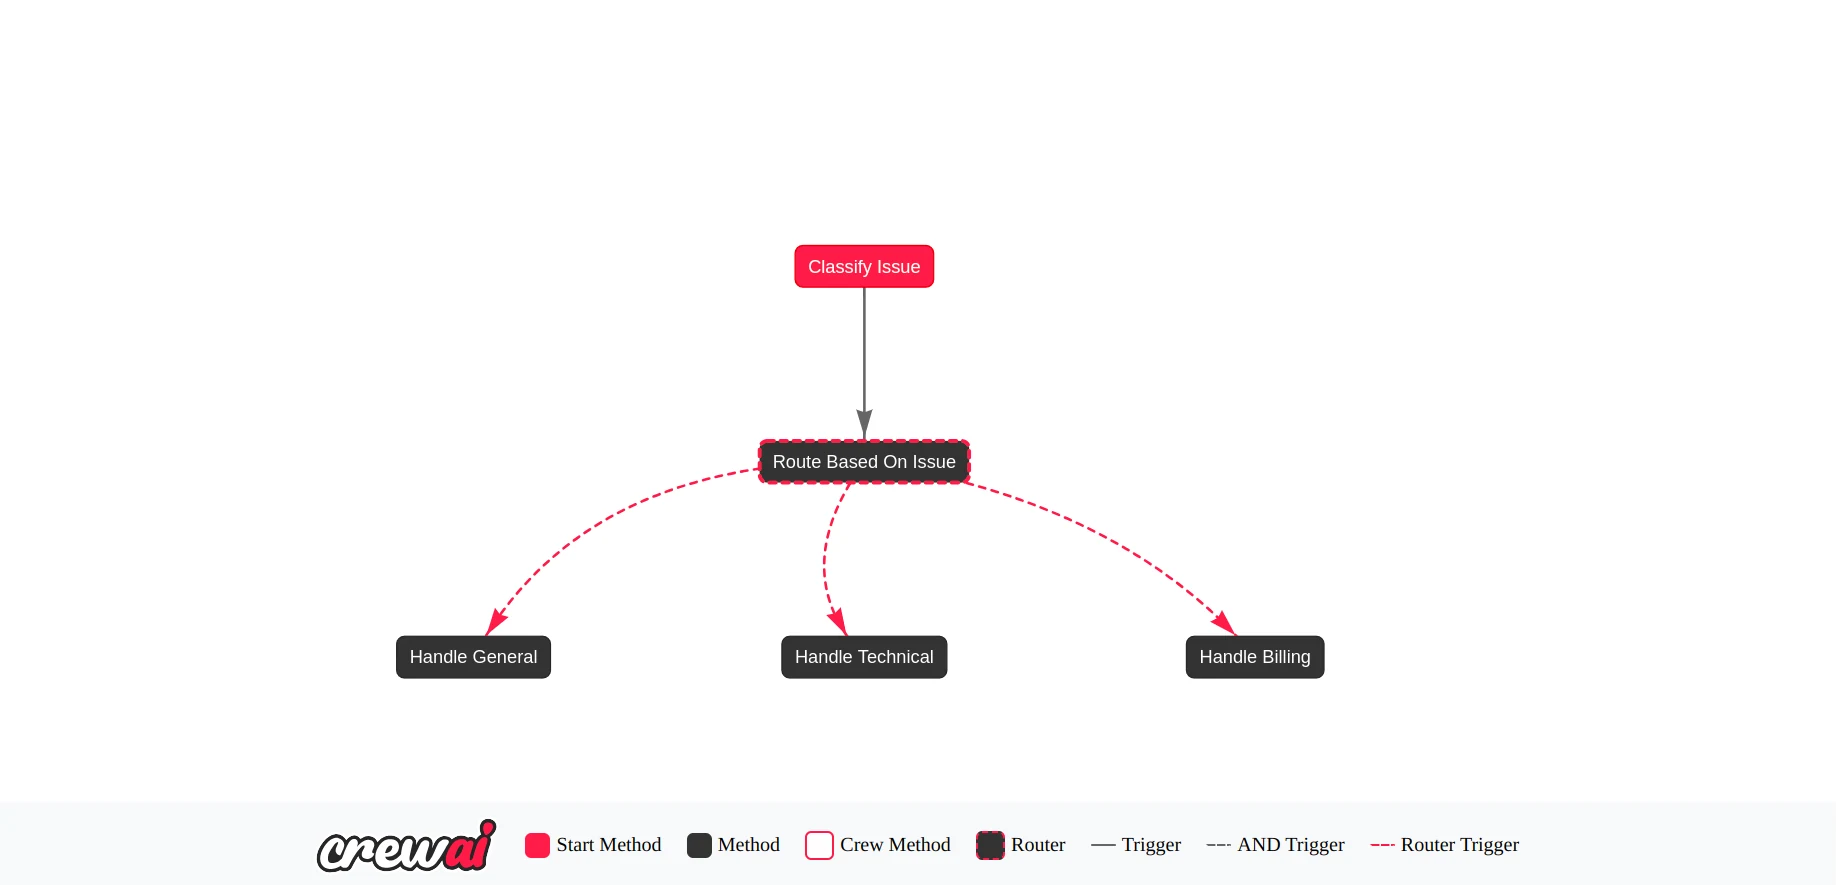
CrewAI의 플로우는 그래프 기반이며 노드 간 전환을 처리하기 위해 이벤트 기반 시스템을 사용합니다. 플로우를 생성하려면 문의를 분류하는 노드로 시작한 다음, 분류를 기반으로 어떤 처리 노드로 라우팅할지 결정하는 라우터 노드를 추가합니다:
class CustomerSupportFlow(Flow[SupportState]):

   @start()
   def classify_issue(self):
       pass

   @router(classify_issue)
   def route_based_on_issue(self) -> str:
       print(f"📨 Routing to agent for issue type: {self.state.issue}")
       if self.state.issue == "billing":
           return "billing"
       if self.state.issue == "technical":
           return "technical"
       else:
           return "general"

   @listen("billing")
   def handle_billing(self):
       pass

   @listen("technical")
   def handle_technical(self):
       pass

   @listen("general")
   def handle_general(self):
       pass
@start() 데코레이터로 장식된 메서드는 플로우의 진입점입니다. 이 경우 문의 분류를 처리합니다. @router() 데코레이터로 장식된 메서드는 classify_issue 이후에 실행되며 어떤 에이전트로 라우팅할지 결정합니다. 다른 메서드들은 라우팅될 때 이벤트 기반 시스템을 사용해 응답합니다.
플로우 메서드 구현하기
이제 각 메서드를 구현하고 각각에 적합한 에이전트를 할당하겠습니다:
class CustomerSupportFlow(Flow[SupportState]):

   @start()
   def classify_issue(self) -> Dict[str, Any]:
       intake_agent = Agent(
           role="User Intake Agent",
           goal="Classify user support issue and summarize the message",
           backstory="You classify the user query into billing, technical, or general categories.",
           llm=LLM(
               model="novita/qwen/qwen2.5-vl-72b-instruct",
               temperature=0.3,
               api_base="https://api.novita.ai/v3/openai",
               api_key=os.environ["NOVITA_API_KEY"]
           ),
           verbose=True
       )

       prompt = f"""
           A user submitted this message: "{self.state.message}"

           Your task:
           1. Identify whether the issue is "billing", "technical", or "general".
           2. Rephrase or extract the message clearly.

           Respond in valid JSON format like the example below:

           {{
               "issue": "billing",
               "message": "The user has been charged twice for their subscription and is requesting a refund."
           }}
       """

       output = intake_agent.kickoff(prompt, response_format=SupportState)

       try:
           # Parse the JSON string
           print(output.raw)
           parsed_json = json.loads(output.raw)

           # Validate with Pydantic
           validated = SupportState(**parsed_json)

           # Save to state
           self.state.issue = validated.issue
           self.state.message = validated.message

       except (json.JSONDecodeError, ValidationError) as e:
           print("❌ Failed to parse or validate response:", e)
           self.state.issue = "general"

   @router(classify_issue)
   def route_based_on_issue(self) -> str:
       print(f"📨 Routing to agent for issue type: {self.state.issue}")
       if self.state.issue == "billing":
           return "billing"
       if self.state.issue == "technical":
           return "technical"
       else:
           return "general"

   @listen("billing")
   def handle_billing(self):
       agent = Agent(
           role="Billing Agent",
           goal="Handle billing questions, refunds, and invoice issues",
           backstory="You resolve billing-related queries effectively.",
           llm=LLM(
               model="novita/meta-llama/llama-3.3-70b-instruct",
               temperature=0.5,
               api_base="https://api.novita.ai/v3/openai",
               api_key=os.environ["NOVITA_API_KEY"]
           ),
           verbose=True
       )
       result = agent.kickoff(self.state.message)
       print("💰 Billing Agent Response:", result)

   @listen("technical")
   def handle_technical(self):
       agent = Agent(
           role="Technical Support Agent",
           goal="Help users resolve technical issues",
           backstory="You're a technical expert providing troubleshooting support.",
           llm=LLM(
               model="novita/meta-llama/llama-3.1-8b-instruct",
               temperature=0.5,
               api_base="https://api.novita.ai/v3/openai",
               api_key=os.environ["NOVITA_API_KEY"]
           ),
           verbose=True
       )
       result = agent.kickoff(self.state.message)
       print("🛠 Technical Agent Response:", result)

   @listen("general")
   def handle_general(self):
       agent = Agent(
           role="General Support Agent",
           goal="Provide helpful answers to non-technical and non-billing questions",
           backstory="You're friendly and well-informed about our services.",
           llm=LLM(
               model="novita/minimaxai/minimax-m1-80k",
               temperature=0.5,
               api_base="https://api.novita.ai/v3/openai",
               api_key=os.environ["NOVITA_API_KEY"]
           ),
           verbose=True
       )
       result = agent.kickoff(self.state.message)
       print("📋 General Agent Response:", result)
classify_issue 메서드는 Pydantic을 사용해 모델이 유효한 응답을 반환하는지 확인합니다. 이 설정이 완료되었으니, 다음 코드를 사용해 플로우를 실행할 수 있습니다:
def run():
   flow = CustomerSupportFlow()
   flow.plot("CustomerSupportFlowPlot")

   # Example input message
   example_input = {
       "message": "Hello, I was charged twice for my subscription and need a refund."
   }

   flow.kickoff(inputs=example_input)

if __name__ == "__main__":
   run()
결론
멀티에이전트 시스템을 구축하려면 다양한 모델을 제공하는 모델 제공자와 에이전트 간의 상호 작용을 오케스트레이션하는 멀티에이전트 프레임워크라는 두 가지 핵심 구성 요소가 필요합니다. 이 글에서는 Novita와 CrewAI가 이러한 역할을 효과적으로 수행할 수 있음을 보여주었습니다. CrewAI에 대해 더 자세히 알아보려면 문서를 확인하세요. 또한 크루에 사용할 더 많은 모델을 실험해보고 싶다면 Novita LLM 플레이그라운드를 확인해 보세요.
파일이 포함된 저장소 - https://github.com/novitalabs/Novita-CollabHub/tree/main/examples/novita-crewai
Novita AI 소개
NovitaAI는 간단한 API를 사용해 AI 모델을 쉽게 배포할 수 있는 방법을 개발자에게 제공하는 동시에, 구축 및 확장을 위한 저렴하고 안정적인 GPU 클라우드를 제공하는 AI 클라우드 플랫폼입니다.